Arecont Vision SurroundVideo AV12366DN Käyttöohje
Arecont Vision
Turvakamera
SurroundVideo AV12366DN
Lue alta 📖 käyttöohje suomeksi merkille Arecont Vision SurroundVideo AV12366DN (21 sivua) kategoriassa Turvakamera. Tämä opas oli hyödyllinen 6 henkilölle ja sai 4.5 tähden keskimäärin 2 käyttäjältä
Sivu 1/21

Arecont Vision SurroundVideo® WDR Camera Installation Manual
1 | P a g e

Arecont Vision SurroundVideo® WDR Camera Installation Manual
1 | P a g e
AV12186DN/AV12366DN SurroundVideo® Installation Manual
Inside the box:
A. Arecont Vision AV12186DN camera
B. Mounting template
C. Security L-key
D. 1.5mm Hex L-key
E. Power cable
F. I/O Cable
G. Pack of four (4) screws and four (4)
anchors.
NOTE: Anchors and screws are good to be used for
concrete, wall block and red bricks. Screws by
themselves can be used in wood.
Not included but needed:
#2 Phillips head screw driver
Image 1
How to Mount the Camera
1. Remove camera and hardware from the
b . ox
2. Using the Mounting template, prepare the
mounting provisions for camera
installation. NOTE: the 19.5mm diameter
hole on the Mounting template is where
the Ethernet cable will be exiting the
AV12186DN camera, align accordingly.
If using the side conduit hole, please see
step 7 below.
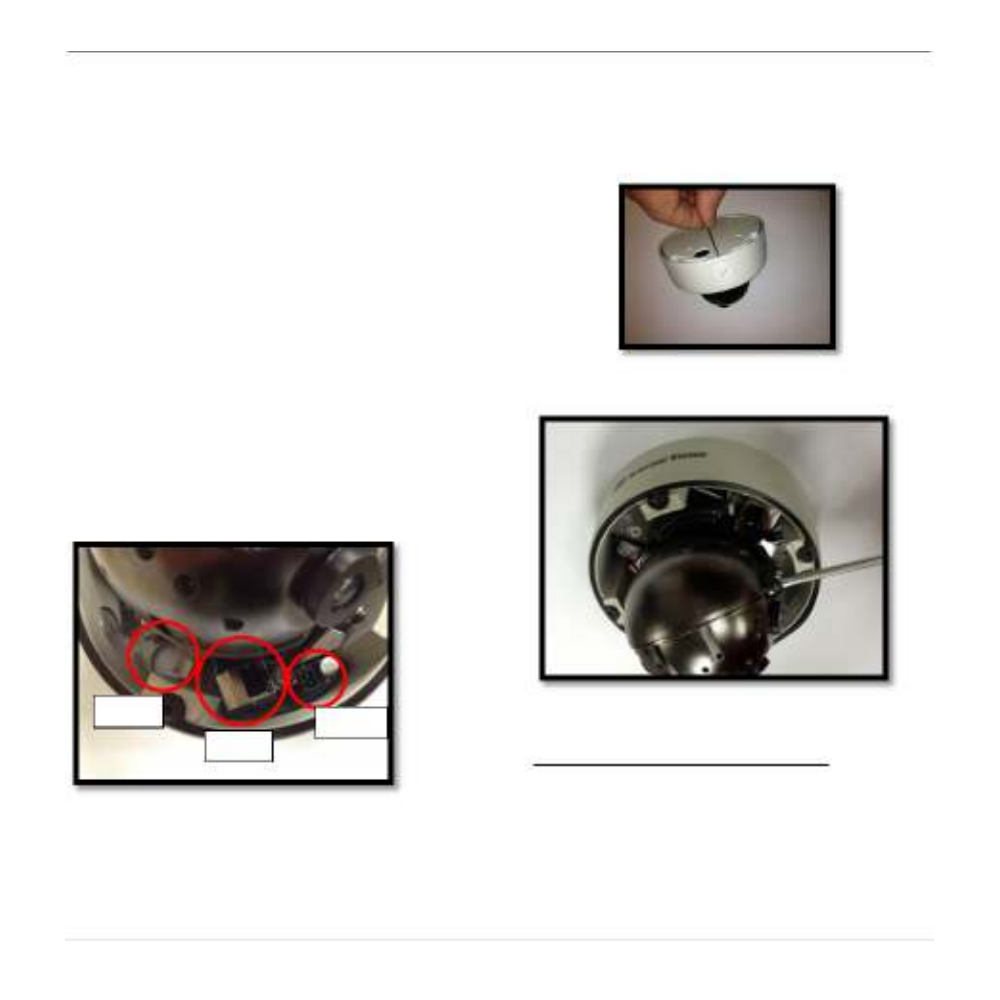
3. Using Security L-key, loosen the four (4)
screws securing the dome cover . (Image 2)
Remove vandal resistant dome cover. NOTE:
Do not remove screws from the dome cover.
Image 2
A
B
C
D
E
F
G
Arecont Vision SurroundVideo® WDR Camera Installation Manual
2 | P a g e
4. Run Ethernet cable through the hole on the
bottom of the camera and plug it (Image 3)
into the RJ45 port.
5. If the camera is powered by a separate
outside AC or DC power source run the ,
supplied power cable through the hole and
connect it to 2-pos. AC/DC power connector
inside the camera (Image 3). NOTE: Make
sure that your installation of wires complies
with Electrical Code of the local government,
where the camera is installed and no bare
wires are exposed.
6. Align the holes in the camera with the
prepared holes on the mounting surface.
Attach the camera to the mounting surface
with the wood screws or any optional
hardware suitable for the mounting surface.
Image 3
7. If you are using the side conduit opening,
remove the conduit plug by first removing the
socket set screw using 1.5mm Hex L-key
(Image 4).
Image 4
Image 5
Adjust Camera Tilt, Pan and Focus:
8. To adjust the gimbal tilt, use #2 Phillips
screwdriver to loosen t screws both sides of wo on
the Gimbal, no more than two full turns (Image 5)
CAUTION: Do not remove the screws!
HOLE
POWER
RJ- 45
Tuotetiedot
| Merkki: | Arecont Vision |
| Kategoria: | Turvakamera |
| Malli: | SurroundVideo AV12366DN |
Tarvitsetko apua?
Jos tarvitset apua merkille Arecont Vision SurroundVideo AV12366DN esitä kysymys alla ja muut käyttäjät vastaavat sinulle
Turvakamera Arecont Vision Käyttöohjeet

3 Helmikuuta 2025
3 Helmikuuta 2025
3 Helmikuuta 2025
3 Helmikuuta 2025
3 Helmikuuta 2025
3 Helmikuuta 2025
3 Helmikuuta 2025
3 Helmikuuta 2025
3 Helmikuuta 2025
3 Helmikuuta 2025
Turvakamera Käyttöohjeet
- Turvakamera Bosch
- Turvakamera Philips
- Turvakamera TP Link
- Turvakamera Eufy
- Turvakamera Axis
- Turvakamera HiLook
- Turvakamera Lorex
- Turvakamera Niceboy
- Turvakamera Moen
- Turvakamera Dahua Technology
- Turvakamera Hikvision
- Turvakamera Yale
- Turvakamera Revo
- Turvakamera Nedis
- Turvakamera I-PRO
- Turvakamera Lumens
- Turvakamera Abus
- Turvakamera Miniland
- Turvakamera Reolink
- Turvakamera BirdDog
- Turvakamera Mobotix
- Turvakamera Milesight
- Turvakamera Honeywell
- Turvakamera Alecto
- Turvakamera AVer
- Turvakamera Alfatron
- Turvakamera Burg-Wachter
- Turvakamera IDIS
- Turvakamera InfiRay
- Turvakamera Konyks
- Turvakamera Hanwha
- Turvakamera GeoVision
- Turvakamera Tecno
- Turvakamera Promise Technology
- Turvakamera Swann
- Turvakamera British Telecom
- Turvakamera Iluv
- Turvakamera Airlive
- Turvakamera YoloLiv
Viimeisimmät Turvakamera Käyttöohjeet
2 Huhtikuuta 2025
30 Maaliskuuta 2025
30 Maaliskuuta 2025
30 Maaliskuuta 2025
30 Maaliskuuta 2025
29 Maaliskuuta 2025
29 Maaliskuuta 2025
27 Maaliskuuta 2025
27 Maaliskuuta 2025
27 Maaliskuuta 2025