PAC APSUB-TY12 Käyttöohje

PAC Ei luokiteltu APSUB-TY12

Lue alta 📖 käyttöohje suomeksi merkille PAC APSUB-TY12 (9 sivua) kategoriassa Ei luokiteltu. Tämä opas oli hyödyllinen 2 henkilölle ja sai 4.5 tähden keskimäärin 2 käyttäjältä

Sivu 1/9
© 2021 AAMP Global. All rights reserved. PAC is a Power Brand of AAMP Global.
PAC-audio.com
C
Page 1
Rev: 2
Date: 052721
®
Advanced Subwoofer Amplier Interface
for Select Toyota / Lexus Vehicles
APSUB-TY12
Introduction and Features
Important Notes
1. Only compatible in vehicles equipped with a data bus controlled premium sound system. To verify compatibility in
Toyota, look for a JBL logo on the radio. In Lexus, compatible applications will have a center channel or factory
subwoofer.
2. If the vehicle is equipped with Toyota Safety Connect or Lexus Enform (SOS), the APSUB audio will need to be muted
when these systems are active. See the Tech Brief "Muting the APSUB during Safety Connect/Enform operation" at
PAC-audio.com for detailed instructions.
3. The factory radio's speed controlled volume, DSP, and surround sound mode are not supported by the APSUB outputs.
4. The factory amplier must remain connected, and in the vehicle after the APSUB has been installed.
5. The remote output is rated at 2A of current. If more current is needed, an external relay must be used.
6. The subwoofer channels are non-fading outputs. The output levels can be controlled using the supplied level control
knob.
7. The level control knob must be connected in order to manually adjust the minimum volume setting.
8. No adjustments can be made manually using the programming button when the module is connected to a PC.
9. Due to variations between various OEM radios and even between radio modes, the radio output voltage may vary
slightly from the selected 5 volt (or 4 volt when DIP switch 2 is down) output.
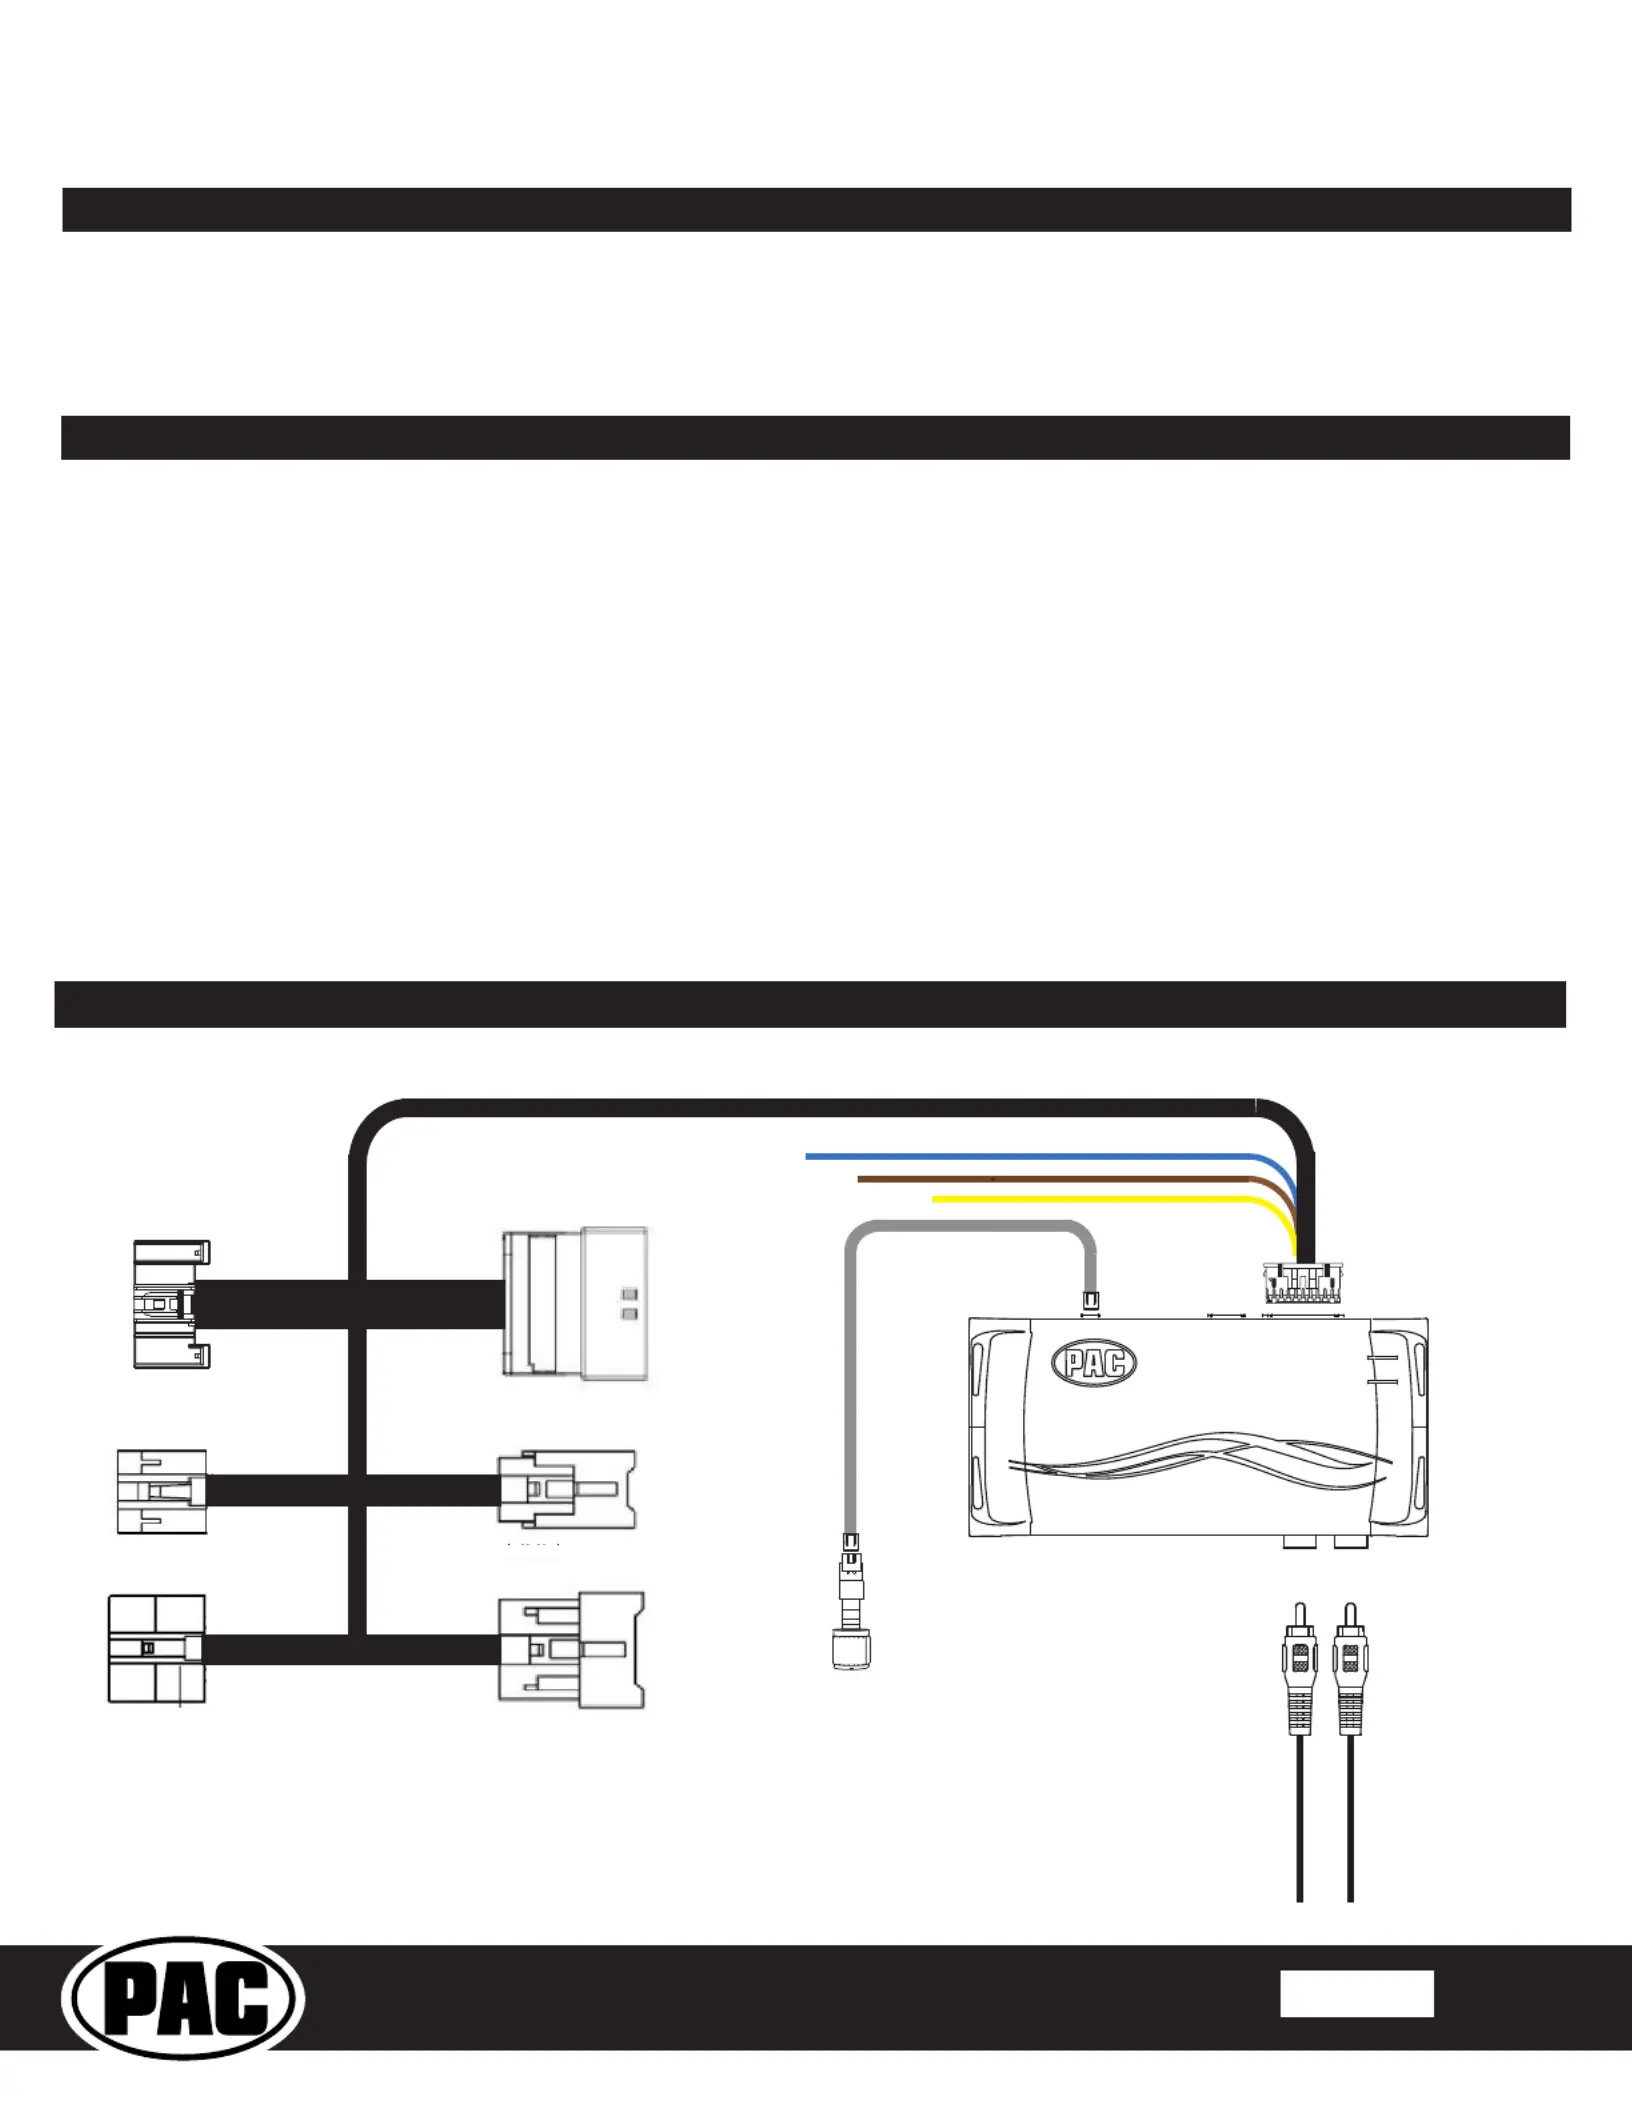
Wiring Connection Chart
To After
Amp
Subwoofer Outputs
To Radio
Non-Fading
Level Control
Knob
To Vehicle
Harness
28 - Pin
6 - Pin
10 - Pin
Remote Turn On Output (2A Max)
Mute Input From Navigation *
Mute Input From Telematics *
* See Page 2 Installation Notes for further details regarding the Mute Input leads.
The APSUB-TY12 provides a 2-channel non-fading output for use with an aftermarket amplier and subwoofer. Using the
full range, xed level head unit output, in conjunction data bus messages, the APSUB-TY12 delivers a variable 5v RMS
pre-amp output with bass equalization and level control capabilities. The signal has a 350Hz / 24dB Linkwitz-Riley low
pass lter applied. A data controlled remote amplier turn on wire is also provided by the APSUB-TY12.
© 2021 AAMP Global. All rights reserved. PAC is a Power Brand of AAMP Global.
PAC-audio.com
C
Page 2
Rev: 2
Date: 052721
®
Advanced Subwoofer Amplier Interface
for Select Toyota / Lexus Vehicles
APSUB-TY12
Setup and Conguration
1. Prior to testing, cycle the ignition on and off to properly initialize the APSUB-TY12.
2. Turn the ignition on. LED 1 on the interface will turn on and the +12v remote output will turn on.
3. Set the amp gain(s) to the desired level. We recommend using an oscilloscope and test tones to set the amp gain(s).
Please refer to the MECP Advanced study guide (p. 360) if you are unfamiliar with this process.
4. Check volume, balance, fade and EQ settings.
5. If you would like to adjust the radio's minimum volume, do so using one of the methods outlined below. If you are happy with
the default level, no adjustments are necessary.
Installation
1. Remove factory radio.
2. Disconnect the 28-pin harness, the 10-pin harness and the 6-pin harness from the radio.
3. Connect APSUB harnesses to vehicle harnesses.
4. Connect APSUB harnesses to factory radio.
5. Set any feature DIP switches that apply to your install.
a. Set DIP switch 2 on (down) to lower the RCA output voltage to 4v. Leave DIP switch 2 off (up) to keep the RCA output
voltage at 5v.
b. DIP switches 1, 3 and 4 are not used and should remain off (up).
6. Connect the APSUB harness to the module.
7. Connect the level control knob to the module and install in an accessible location.
8. Connect the signal cables and remote input from the aftermarket amplier.
9. The Yellow / Black "Mute Input from Telematics" wire will be used in conjunction with the Safety Connect / Lexus Enform
(SOS) Mute Retention. See note regarding these features on page 1.
10. The Brown "Mute Input From Navigation" is a spare mute lead that can be used for custom applications. The audio will be
muted whenever the Brown wire is supplied a ground.
DIP
1 2 3 4
ON
Not Used 5v / 4v Preout Not Used Not Used
1 2 3 4
Set DIP switches to the ON position to activate the corresponding features.
Set DIP switches to the OFF position for any features that are not desired.
Module Layout
LED 1
Interface Connector 1
Expansion Port
Programming Button
Feature Select
DIP switches
Non-Fading Level Control
Knob Connection
USB Connection
Subwoofer Outputs
LED 2
The aftermarket amplier must have a very solid ground and the amplier power/ground
connections should be made before connecting the RCA's or Remote Turn On
to the APSUB-TY12
© 2021 AAMP Global. All rights reserved. PAC is a Power Brand of AAMP Global.
PAC-audio.com
C
Page 3
Rev: 2
Date: 052721
®
Advanced Subwoofer Amplier Interface
for Select Toyota / Lexus Vehicles
APSUB-TY12
Setup and Conguration (cont.)
Manually Setting the Minimum Volume
If the minimum volume of the radio (factory radio volume level 1) is too loud, you can manually set the level of the minimum
volume using the programming button on the side of the interface and level control knob. If you would like to set the minimum
volume using the AmpPRO app, please proceed to the AmpPRO App section.
PLEASE NOTE: Level control knob must be connected to the module in order to set the Minimum Volume.
Setting the minimum volume using the programming button
1. Set the amp gains to the desired level.
2. Start with the level control knob turned all the way down (counter-clockwise).
3. Set the volume on the factory radio to 1.
4. Press the programming button on the side of the interface once.
5. LED 1 will turn amber.
6. Turn the level control knob clockwise until the desired minimum volume level is reached.
7. You can now either press the programming button once or wait ten seconds to exit the settings.
AmpPRO App
Use of the AmpPRO PC App
allows you to do the following:
Congure User Interface Options such as:
• Minimum Volume Level
• Enable / Disable Factory EQ
• Set Bass Center Frequencies and Q Factor
• Update Product Firmware
• Read Firmware / Hardware Versions
You can download the AmpPRO app at :
https://pac-audio.com/app-downloads/
Open the AmpPRO application and connect the interface to the computer using a micro USB cable.
Select Congure to access the following settings:
Minimum Volume Level - This allows you to set the minimum volume level of the factory radio (factory radio volume level 1).
EQ Enabled - This allows you to enable / disable the bass band factory EQ from adjusting the APSUB output.
Bass Freq / Q Factor - This allows you to set the center frequency that will be adjusted when using the bass band on the
factory EQ, as well as the Q Factor for the frequency. The Q Factor determines how many of the adjacent frequencies will be
affected when adjusting the selected frequency. The lower the Q Factor, the more frequencies will be affected. See Page 4 for
available frequencies and Q Factors. Note: This setting only affects the output of the APSUB and does not change the way that
the factory EQ adjusts the factory speakers.
PLEASE NOTE: These settings can be adjusted with the module installed in the vehicle, or on the bench. However, it
is recommended to make the adjustments with the module installed, and the factory radio on, so that the changes can
be heard.

Tuotetiedot

Merkki: PAC
Kategoria: Ei luokiteltu
Malli: APSUB-TY12

Tarvitsetko apua?

Jos tarvitset apua merkille PAC APSUB-TY12 esitä kysymys alla ja muut käyttäjät vastaavat sinulle


Ei luokiteltu PAC Käyttöohjeet

PAC

PAC AOEM-GM1416A Käyttöohje

15 Lokakuuta 2024
PAC

PAC SR-TUN14H Käyttöohje

15 Lokakuuta 2024
PAC

PAC AOEM-HON20 Käyttöohje

15 Lokakuuta 2024
PAC

PAC TVC104 Käyttöohje

15 Lokakuuta 2024
PAC

PAC CDK651 Käyttöohje

15 Lokakuuta 2024
PAC

PAC MAZATO Käyttöohje

15 Lokakuuta 2024
PAC

PAC AOEM-GM21C Käyttöohje

15 Lokakuuta 2024
PAC

PAC APSUB-TY12 Käyttöohje

15 Lokakuuta 2024
PAC

PAC LPGL-2 Käyttöohje

15 Lokakuuta 2024
PAC

PAC GMK403 Käyttöohje

15 Lokakuuta 2024

Ei luokiteltu Käyttöohjeet

Viimeisimmät Ei luokiteltu Käyttöohjeet