Posiflex RT-6115 Käyttöohje
Lue alta 📖 käyttöohje suomeksi merkille Posiflex RT-6115 (17 sivua) kategoriassa Laatikko. Tämä opas oli hyödyllinen 2 henkilölle ja sai 4.5 tähden keskimäärin 2 käyttäjältä
Sivu 1/17

1
FCC NOTES
This equipment has been tested and found to comply with the limits for a Class A digital device,
pursuant to part 15 of the FCC Rules. These limits are designed to provide reasonable protection
against harmful interference when the equipment is operated in a commercial environment. This
equipment generates, uses, and can radiate radio frequency energy and, if not installed and used in
accordance with the instruction manual, may cause harmful interference to radio communications.
Operation of this equipment in a residential area is likely to cause harmful interference in which
case the user will be required to correct the interference at his own expense.
This device complies with part 15 of the FCC Rules. Operation is subject to the following two
conditions: (1) This device may not cause harmful interference, and (2) this device must accept
any interference received, including interference that may cause undesired operation.
CE CLASS A WARNING
This equipment is compliant with Class A of CISPR 32. In a residential environment this
equipment may cause radio interference.
AVERTISSEMENT CE CLASSE A
Cet équipement est conforme à la classe A de CISPR 32. Dans un environnement résidentiel, cet
équipement peut provoquer des interférences radio.
WARRANTY LIMITS
Warranty will terminate automatically when the machine is opened by any person other than the
authorized technicians. The user should consult his/her dealer for the problem happening.
Warranty voids if the user does not follow the instructions in application of this merchandise. The
manufacturer is by no means responsible for any damage or hazard caused by improper application.
LIMITES DE GARANTIE
La garantie prend n automatiquement lorsque la machine est ouverte par une personne autre que
les techniciens autorisés. L'utilisateur doit consulter son revendeur pour le problème qui se produit.
La garantie s'annule si l'utilisateur ne suit pas les instructions d'application de cette marchandise.
Le fabricant n'est en aucun cas responsable de tout dommage ou danger causé par une mauvaise
application.
警告
警告
警告
警告警告
為避免電磁干擾,本產品不應安裝或使用於住宅環境。
SAFETY INSTRUCTIONS
This equipment is not suitable for use in locations where children are likely to be present.
CONSIGNES DE SÉ CURITÉ
Cet équipement ne convient pas à une utilisation dans des lieux pouvant accueillir des
enfants.
RA-301/311/305/307
Side Attachment for RT-series Terminals
User Manual
RA-3xx Series Ver. D0

2
Revision History
Date
Version
Description
2018 5/07 /0
A0
For Preliminary Release
2020/03/13
B0
Add CE/FCC warning notes and ROHS
table.
2024/01/18
C0
Add new model RA-305-15 & RA-307-
15
2024/08/27
D0
According to ECN RDM-RT-046, RT-
xx16 can support RA-3xx series model.
Add new model RA-305-16 & RA-307-
16

3
RA-301 (MSR / 2D Imager / Fingerprint)
Package Contents
RA- 301 Side Attachment……………………(1)
Back Cover…………………………………..(1)
Fixing Screw (M3)…………….…………….(2)
2D Imager Quick Setup Guide ………………(1)
(For attachment with 2D scanner)
RA-311 (MSR / 2D Imager / RFID)
Package Contents
RA- 311 Side Attachment……………………(1)
Back Cover…………………………………..(1)
Fixing Screw (M3)……………….………….(2)
2D Imager Quick Setup Guide ………………(1)
(For attachment with 2D scanner)
RA-305 (MSR / RFID / iButton)
Package Contents
RA-3 . (1) 05 Side Attachment… ……… …………
Back Cover…………………………………...(1)
Plastic Middle Bracket (only for 15.6 POS ”
terminal)………………………………… ….. (1)
Fixing Screw ..(2) (M3)………………….………
RA-307 (MSR / RFID / Fingerprint)
Package Contents
RA-307 Side Attachment . …… ………………(1)
Back Cover…………………………………...(1)
Plastic Middle Bracket (only for 15.6 POS ”
terminal)…………………………………......(1)
Fixing Screw . (M3)…………………….… ….(2)
4
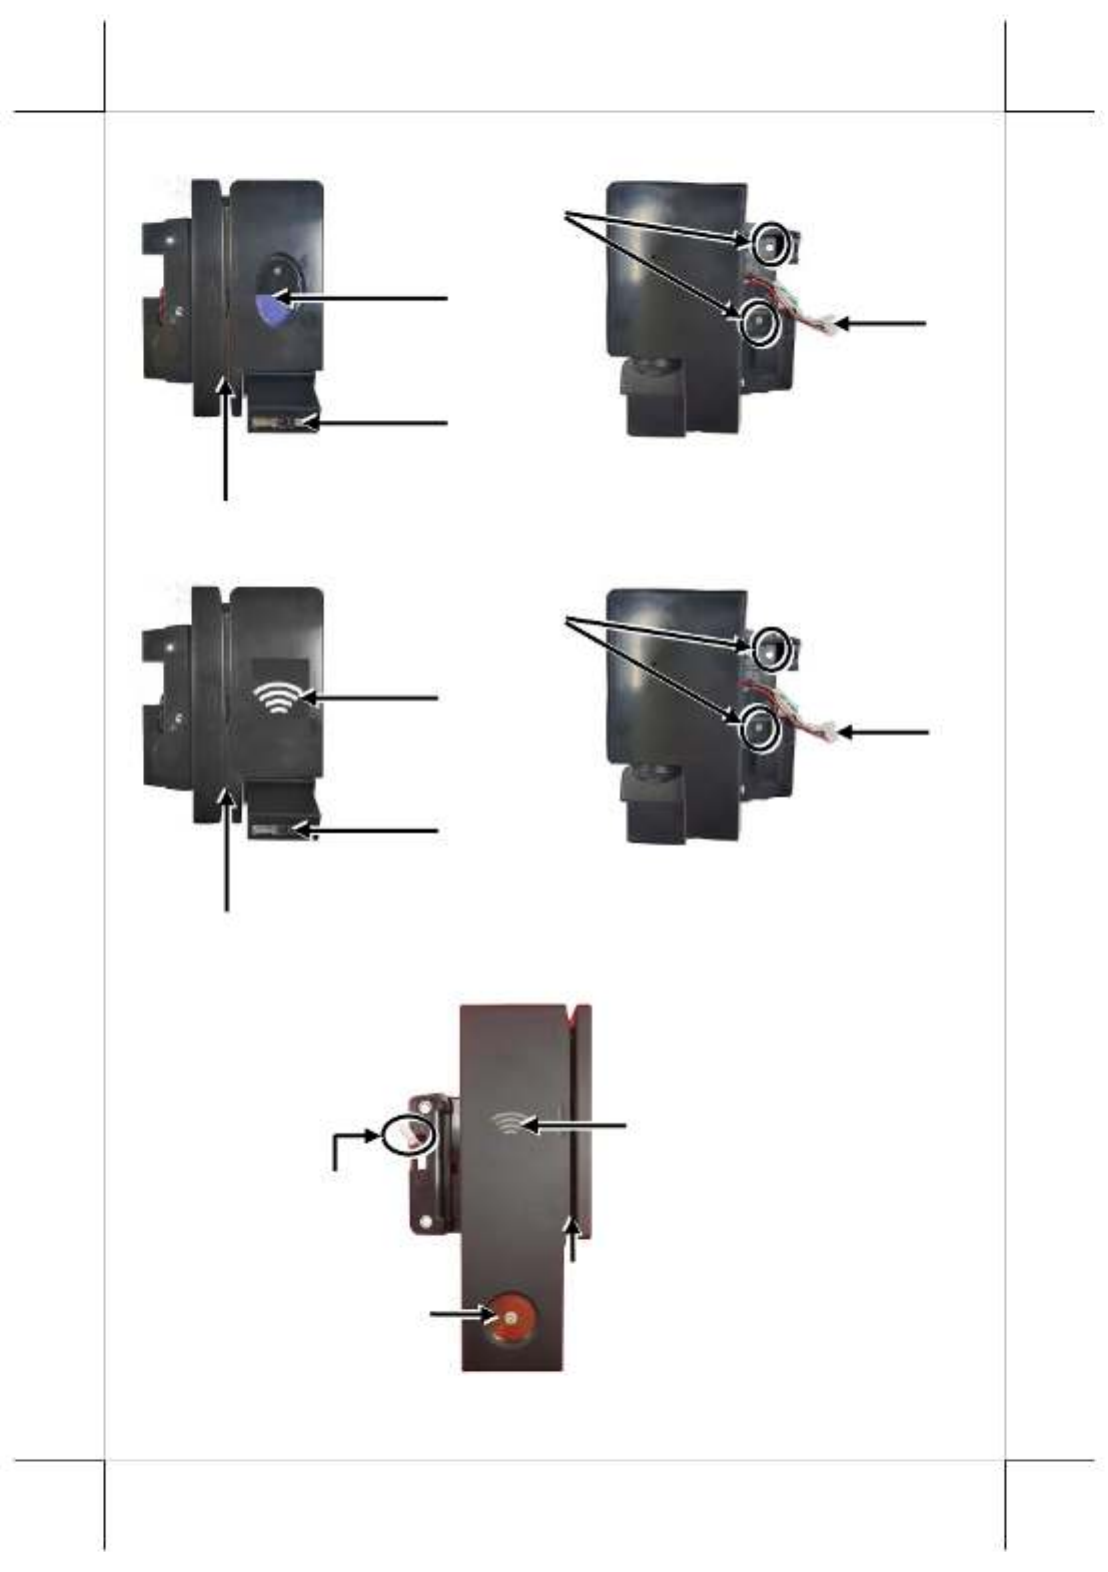
Views of the -301 RA
Views of the -311 RA
Views of the -305 RA
3-track Magnetic Stripe Reader (Optional)
RFID Card Reader
(Optional)
Scan Window w/
Object Detector (Optional)
Screws Holes
USB I/O Cable
3-track Magnetic Stripe Reader (Optional)
Fingerprint Sensor
with Status LED Indicator
(Optional)
USB I/O Cable
Scan Window
w/ Object Detector (Optional)
Screws Holes
USB I/O Cable
3-track Magnetic Stripe Reader
iButton Sensor
(Optional)
RFID Reader (Optional)

5
Views of the -307 RA
Installing RA-301/311 Series to RT-series Terminals
1. Use slotted screwdriver to remove the cover for attachment bay which is
located on the left side of the rear of your RT-series terminal.
2. Connect the cable of RA-301/311 to the cable connector from mainboard
of your RT-series terminal. Then, tuck excess cables inside the attachment
bay of the terminal.
USB I/O Cable
3-track Magnetic Stripe Reader
FingerPrint Sensor
(Optional)
RFID Reader (Optional)

6
3. Align the screw holes of RA-301/311 with the mounting holes inside the
attachment bay of your RT-series terminal.
4. Secure -301/311 with two screws.RA
5. Push the excess cable to the inside.
6. Push the back cover for -301/311 until it is locked into place as shown RA
in the gure below.
Installing RA-305/307 Series to RT-series Terminals
1. Use slotted screwdriver to remove the cover for attachment bay which is
located on the left side of the rear of your RT-series terminal.

7
2. 30 Connect the cable of RA- 5/307 to the cable connector from mainboard
of your RT-series terminal. Then, tuck excess cables inside the attachment
bay of the terminal. Please note that for POS terminal, there is a 15.6”
plastic middle bracket need to be installed between the MSR
attachment and the POS terminal.
3. Align the screw holes of RA-305/307 with the mounting holes inside the
attachment bay of your RT-series terminal, and then secure -305/307 RA
with two screws.
RA- 5/307 (for RT- 30 15” model)
Plastic middle bracket only
for POS terminal. 15.6”

8
RA- 5/307 (for RT- .6 30 15 ” model)
4. Push the excess cable to the inside. And then push the back cover for -RA
305/307 until it is locked into place as shown in the gure below.
Driver/Utility Installation and Utility Outline
Before installing the drivers of the RA series attachment, after installing the
RA series attachment, power on your RT-series terminal.
Installing and Starting the Posiex USB MSR Manager
1. Before installing the USB MSR Manager, please visit Posiex ocial
website (https://www.posiex.com/document/driver-and-
utility/?pmid=159,178&pid=484) to download the utility.
2. After downloading follow the step-it, by-step instructive messages to
complete the manager installation.
3. After completion of the manager installation, restart your terminal.
4. Open the MSR manager.

9
※ If you purchase the attachment having MSR of which the interface is KB
wedge, ignore the following step s.
5. If you purchase the attachment having the MSR of which the interface
is virtual COM, tick o on and tap virtual COM port interface Save
& Exit to exit from the manager.
6. Please visit Posiex ocial website
(https://www.posiex.com/document/driver-and-
utility/?pmid=159,178&pid=484) to download the virtual COM
driver.
7. After downloading follow the step-it, by-step instructive messages to
complete the driver installation.
8. After completion of the driver installation, restart your terminal.
Installing the RFID Setup Tool
1. If you purchase the attachment having the RFID module of which the
interface is Virtual COM lease visit Posiex ocial website , p
(https://www.posiex.com/document/driver-and-
utility/?pmid=159,178&pid=484) to download the virtual COM
driver.
※ If you purchase the attachment having the RFID module of which the
interface is KB wedge, ignore this step and just go to step 3 for the RFID
Setup Tool installation.
2. Then, follow the step-by-step instructive messages to complete the
virtual COM driver installation.
3. Please visit Posiex ocial website
(https://www.posiex.com/document/driver-and-
utility/?pmid=159,178&pid=484) to download the RFID Setup Tools.
4. Then, follow the step-by-step instructive messages to complete the tool
installation.

10
5. After completion of the tool installation, restart your terminal.
6. Left click the icon and then the tool appears.RFID Setup Tools
Installing the Fingerprint Driver
1. Please visit Posiex ocial website
(https://www.posiex.com/document/driver-and-
utility/?pmid=159,178&pid=484) to download the ngerprint driver.
2. Then, follow the step- -step instructive messages to complete the by
driver installation.
3. After completion of the driver installation, restart your terminal.
Setting up the Imager 2D
To enable you to congure the imager based on personal preferences, 2D
two options are oered to achieve the purpose: the advanced user manual,
which contains a complete set of barcode labels, and the quick setup guide
with most frequently used barcode labels. Please visit Posiex Global
Website (https://www.posiex.com/document/user-
manual/?pmid=159,178&pid=484) to download the related documents.
Using the RA Series Attachment
After installing the drivers and tools, you can start to operate the RA series
attachment.
Magnetic Stripe Reader (MSR)
RA series attachment with magnetic strike reader mainly serves to read
and decode data from magnetic stripe. Please go through the following
tips while swiping your MSR cards though the reader:
1. Swipe your card with the side of magnetic stripe facing your
terminal screen.
2. Swipe your card along the track of the reader in the direction shown
in the gure.
Tuotetiedot
| Merkki: | Posiflex |
| Kategoria: | Laatikko |
| Malli: | RT-6115 |
Tarvitsetko apua?
Jos tarvitset apua merkille Posiflex RT-6115 esitä kysymys alla ja muut käyttäjät vastaavat sinulle
Laatikko Posiflex Käyttöohjeet

20 Helmikuuta 2025
20 Helmikuuta 2025
20 Helmikuuta 2025
8 Joulukuuta 2024
8 Joulukuuta 2024
15 Lokakuuta 2024
15 Lokakuuta 2024
15 Lokakuuta 2024
15 Lokakuuta 2024
15 Lokakuuta 2024
Laatikko Käyttöohjeet
Viimeisimmät Laatikko Käyttöohjeet
20 Tammikuuta 2025
19 Tammikuuta 2025
2 Tammikuuta 2025
30 Joulukuuta 2025
26 Joulukuuta 2024
26 Joulukuuta 2024
26 Joulukuuta 2024
26 Joulukuuta 2024
26 Joulukuuta 2024
26 Joulukuuta 2024