Teradek Bolt 500 XT Käyttöohje
Teradek
Hi-fi järjestelmä
Bolt 500 XT
Lue alta 📖 käyttöohje suomeksi merkille Teradek Bolt 500 XT (1 sivua) kategoriassa Hi-fi järjestelmä. Tämä opas oli hyödyllinen 2 henkilölle ja sai 4.5 tähden keskimäärin 2 käyttäjältä
Sivu 1/1
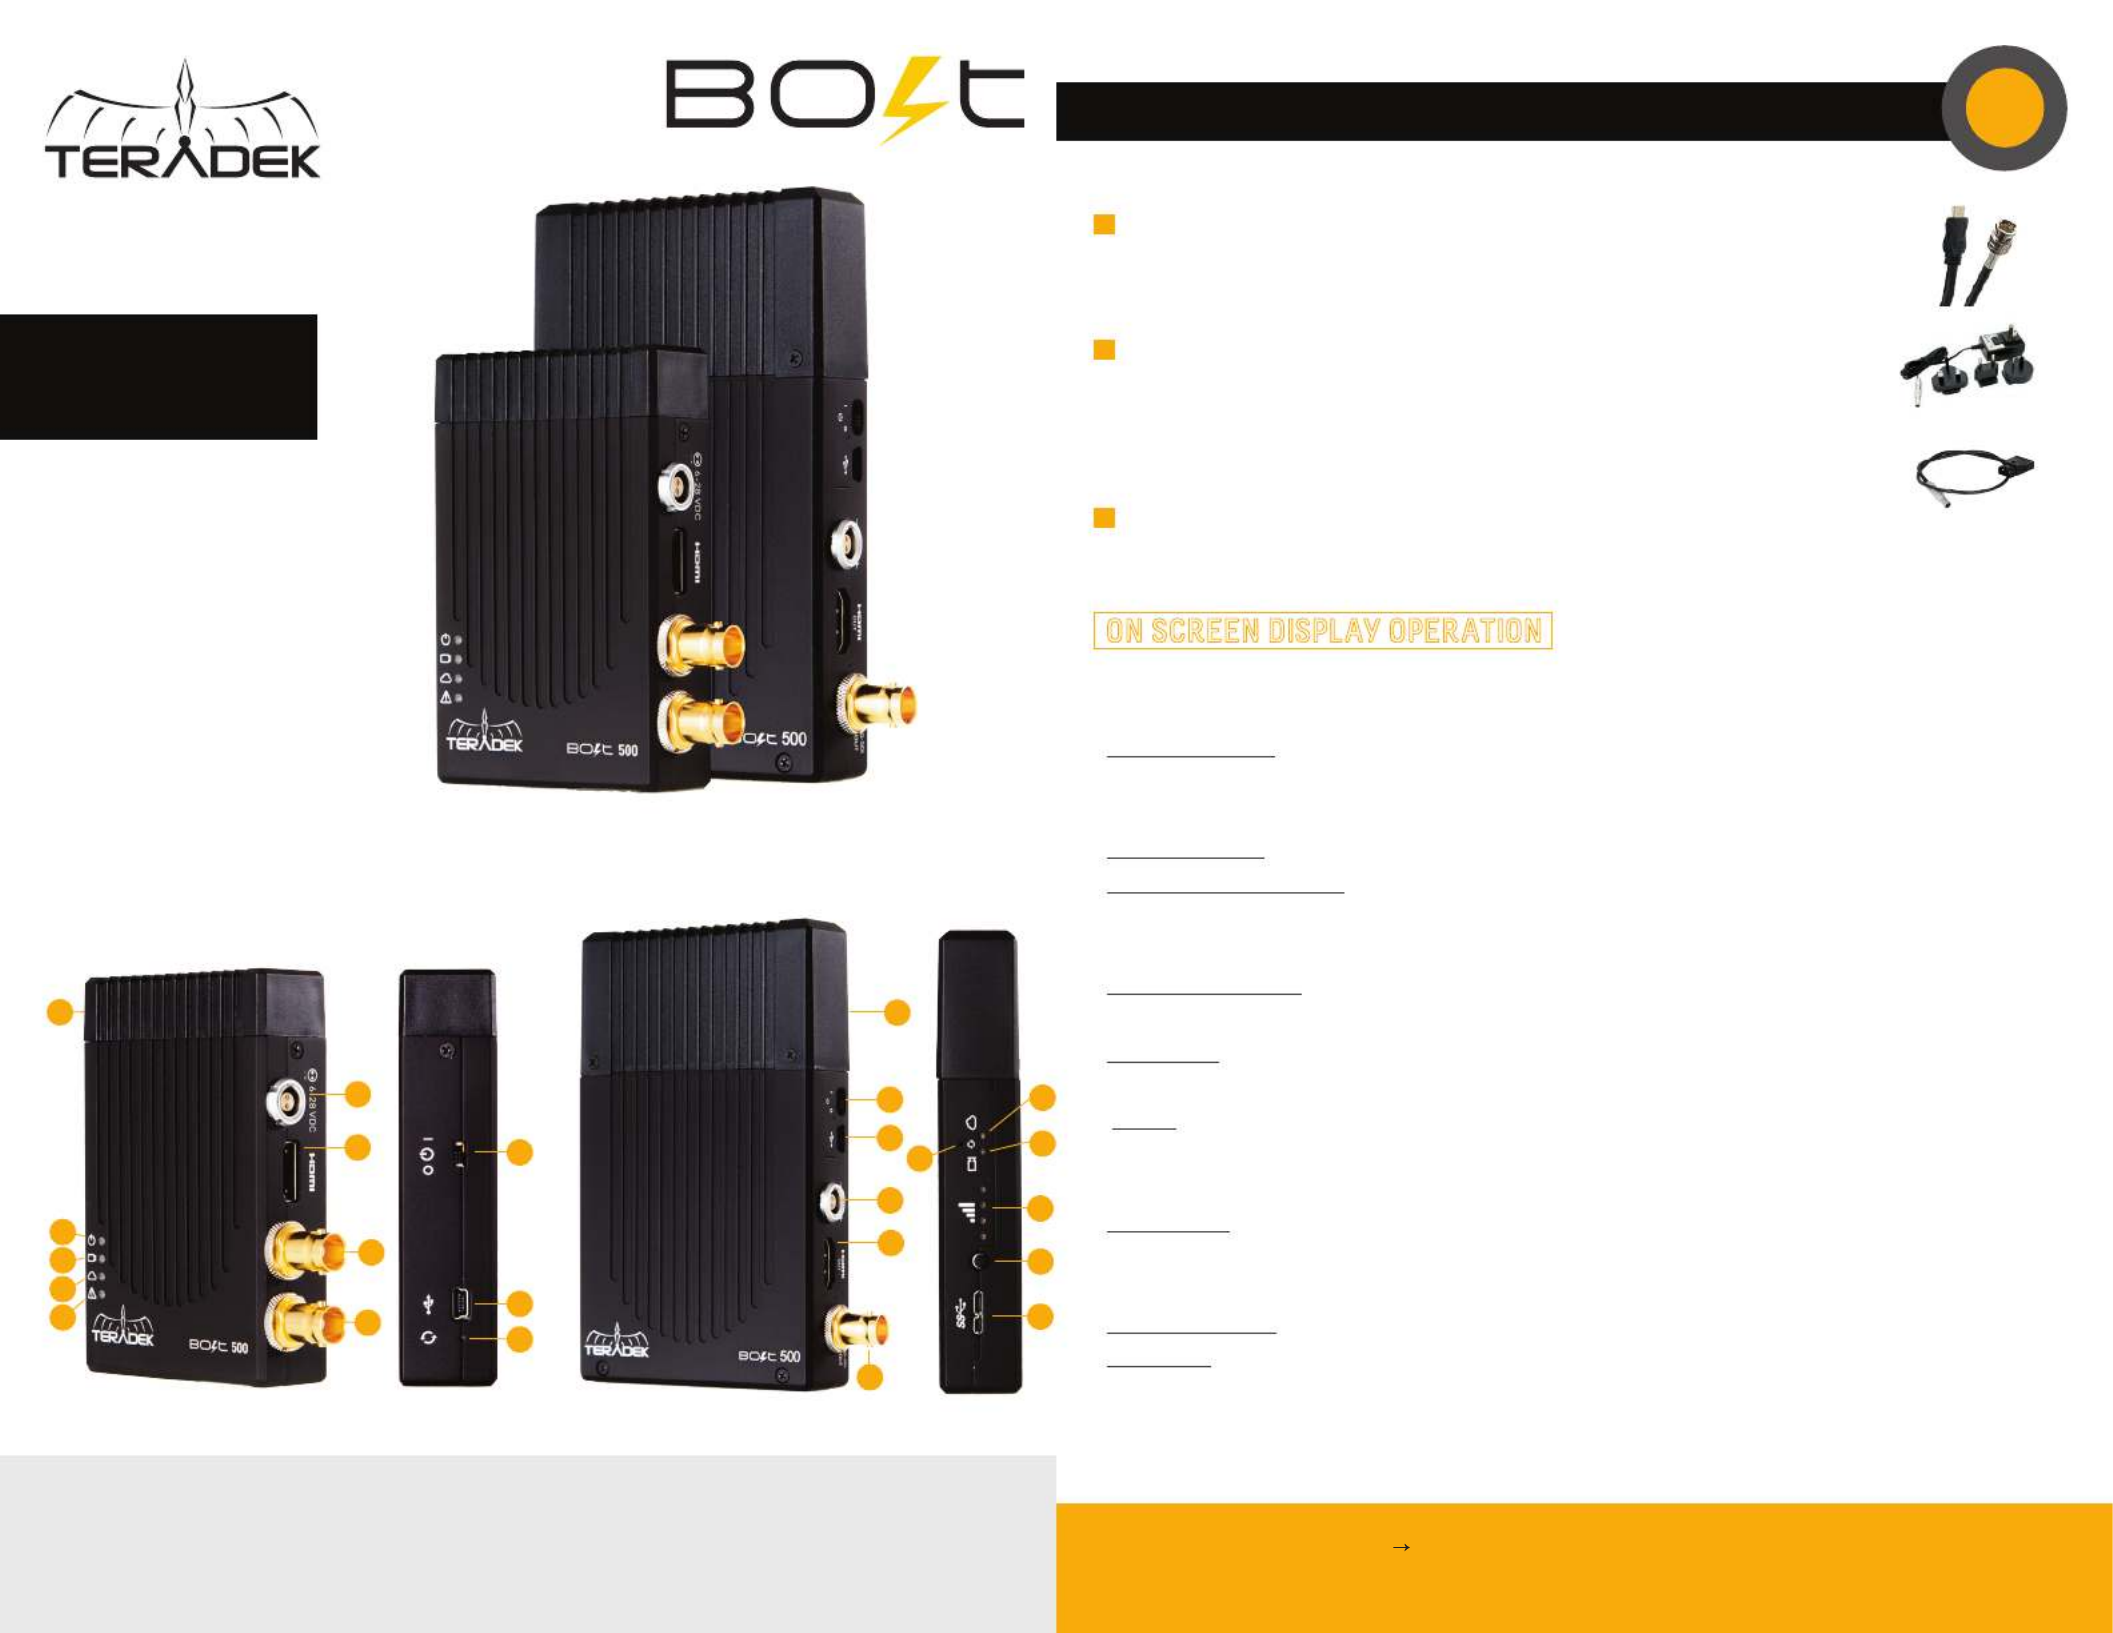
A: Internal Antenna
B: Power Status
C: Video Status
D: Link Status
E: Fault LED
F: 6 28V DC Input-
G: HDMI Input
H: 3G SDI Output-
I: 3G SDI Input-
J: Power Switch
K: Mini USB Port
L: HDMI Output
M: Link Quality Indicator
N: Menu Joystick
O: USB 3.0 Port
P: Reset Button
SDI
HDMI
NEED MORE HELP?
Support: http://support.teradek.com Contains tips, information and all the latest firmware & software updates.
TERADEK SUPPORT STAFF: support teradek.com or call 888 941 2111 ext2 (Mon Fri 7am to 6pm PST)@− − −
Bolt 500
CONNECT AND POWER YOUR DEVICE
Connect the output from your video source to the SDI/HDMI input on the Bolt (G,I)
transmitter. Connect either the SDI or HDMI output from the Bolt receiver to (H,L)
the video input on your monitor.
Zero Delay
Wireless HD Video
The Bolt is a zero delay
wireless video transmission
system designed for the
most demanding cinema,
broadcast, and UAV
applications. At less than
1ms latency, Bolt can
transmit 1080p60 4:2:2 video
at up to 500ft line of sight over
the unlicensed 5GHz band.
Move the power switches on both the transmitter and receiver to the position.
(J) ON
Video appears within a few seconds.
Connect power to your Bolt transmitter using the included P Tap to Connector -
cable. Power the Bolt receiver with the included A/C adapter or battery plate
accessory. If using the battery plate, connect a compatible battery (AB Gold mount
or V Lock) to the plate, and connect the short cable from the plate to the receiver’s -
DC input .
(F)
1
3
2
AC adapter
P Tap to 2 pin -
Connector
Status Screens - Connect your receiver to a monitor and activate the OSD by depressing the ‘Menu Joystick’
button (N), and cycle through screens by pressing the button up or down. Hide the status screen by pressing left.
• Main Status Screen - This screen displays the status of the wireless receiver, along with the current video
resolution, frequency, link quality (if connected).
• Time Code Screen - Displays the current time code if received from the transmitter.
• Temperature Status Screen - Displays the current internal temperature of the unit.
Menu Operation - Launch the menu by pressing right while the OSD is active. Exit from the menu by
pressing left.
• HDMI/SDI Out Format Select the video output format. You can choose to match the video source resolution -
by selecting ‘Same as Input,’ or choose from the resolutions listed.
• Test pattern Select a video output format from this menu to output a test pattern over HDMI and SDI. Return -
to the previous video by pressing left on the ‘Menu’ joystick.
• Pairing Select Pairing to link your receiver with another transmitter. Once pairing is activated on the -
receiver, turn on the transmitter and use a paper clip to hold the reset button for 1 second and
(P)
release. The red warning LED and link LEDs will blink to indicate that pairing is active.
• OSD Settings Choose when to display the OSD. By default, the OSD is displayed when the link is down. -
"Hidden by default" hides the OSD until it is activated by the joystick. If "Always show OSD" is
selected, the OSD will be displayed unless deactivated by the joystick.
• Reset All Settings Use this to reset all configurable options to their factory defaults.-
• Device Info Displays the model and serial number.-
F
A
F
J
K
P
J
K
G
L
H
I
B
C
D
E
Bolt TX
N
A
H
Bolt RX
M
O
D
C
ON SCREEN DISPLAY OPERATION
P
Tuotetiedot
| Merkki: | Teradek |
| Kategoria: | Hi-fi järjestelmä |
| Malli: | Bolt 500 XT |
Tarvitsetko apua?
Jos tarvitset apua merkille Teradek Bolt 500 XT esitä kysymys alla ja muut käyttäjät vastaavat sinulle
Hi-fi järjestelmä Teradek Käyttöohjeet

28 Maaliskuuta 2025
28 Maaliskuuta 2025
28 Maaliskuuta 2025
28 Maaliskuuta 2025
28 Maaliskuuta 2025
28 Maaliskuuta 2025
28 Maaliskuuta 2025
28 Maaliskuuta 2025
28 Maaliskuuta 2025
28 Maaliskuuta 2025
Hi-fi järjestelmä Käyttöohjeet
- Hi-fi järjestelmä LG
- Hi-fi järjestelmä Philips
- Hi-fi järjestelmä Samsung
- Hi-fi järjestelmä Razer
- Hi-fi järjestelmä Sony
- Hi-fi järjestelmä GoGEN
- Hi-fi järjestelmä Pro-Ject
- Hi-fi järjestelmä Morel
- Hi-fi järjestelmä Extron
- Hi-fi järjestelmä Honor
- Hi-fi järjestelmä Pioneer
- Hi-fi järjestelmä Audio-Technica
- Hi-fi järjestelmä Pyle
- Hi-fi järjestelmä Sencor
- Hi-fi järjestelmä NAD
- Hi-fi järjestelmä Auna
- Hi-fi järjestelmä OSD Audio
- Hi-fi järjestelmä Audizio
- Hi-fi järjestelmä Bluesound
- Hi-fi järjestelmä CSL
- Hi-fi järjestelmä NUVO
- Hi-fi järjestelmä Smart-AVI
- Hi-fi järjestelmä Majority
- Hi-fi järjestelmä SPL
- Hi-fi järjestelmä Vivax
- Hi-fi järjestelmä Anchor Audio
- Hi-fi järjestelmä Sven
- Hi-fi järjestelmä Antelope Audio
- Hi-fi järjestelmä Energy Sistem
- Hi-fi järjestelmä Vizio
- Hi-fi järjestelmä ESX
- Hi-fi järjestelmä Electro-Voice
- Hi-fi järjestelmä Accsoon
- Hi-fi järjestelmä Cyrus
- Hi-fi järjestelmä Vimar
- Hi-fi järjestelmä AVer
- Hi-fi järjestelmä Ferguson
- Hi-fi järjestelmä ART
- Hi-fi järjestelmä Boston Acoustics
- Hi-fi järjestelmä Ruark Audio
- Hi-fi järjestelmä Magnavox
- Hi-fi järjestelmä Titanwolf
- Hi-fi järjestelmä Acoustic Solutions
- Hi-fi järjestelmä NEAR
- Hi-fi järjestelmä Vaxis
- Hi-fi järjestelmä INKEE
Viimeisimmät Hi-fi järjestelmä Käyttöohjeet
1 Huhtikuuta 2025
1 Huhtikuuta 2025
29 Maaliskuuta 2025
26 Maaliskuuta 2025
26 Maaliskuuta 2025

16 Maaliskuuta 2025
1 Maaliskuuta 2025
19 Helmikuuta 2025
16 Tammikuuta 2025
12 Tammikuuta 2025