Emporia TALKglam Käyttöohje
Emporia
Älypuhelin
TALKglam
Lue alta 📖 käyttöohje suomeksi merkille Emporia TALKglam (28 sivua) kategoriassa Älypuhelin. Tämä opas oli hyödyllinen 8 henkilölle ja sai 4.5 tähden keskimäärin 2 käyttäjältä
Sivu 1/28

Eveline Pupeter, emporia Telecom
www.emporia.eu
Thank you for purchasing an emporia product!
Please read this user guide before attempting to use your phone.
English
TALKglam

1 Loudspeaker
2 Display (screen)
3 Green key
• Start or accept a call
• In the menu:
Conrm selection
• On standby: Access Chats
4 Arrow keys
• Use these to ick through
your Contacts and
the Menu.
• When the phone is on
standby, press to
call up the .Menu
• When the phone is on
standby, press to
access Contacts.
5 Red key
• When in a call: End
• When in the menu:
One step back
• When entering digits or
letters: Delete
• Press and hold: On/O
6 Speed-dial keys
7 key (voicemail)
8 Handset volume control
buttons and
9 Port for a charging cable or
USB headset
10 Emergency button
(optional)
11 Battery cover
12 Opening for removing
thebattery cover
13 Camera and external display
YOUR MOBILE PHONE AT A GLANCE
2
1
4
6
9
5
10 13
11
9
12 9
3 8
7

Symbols on the screen
Network signal
strength
Roaming (abroad)
Mobile data enabled
Battery indicator
Missed call
Call forwarding
New text message
(SMS)
Prole: Silent/Sleep
mode
Prole: Maximum
Prole: Meeting/
Theatre mode
USB headset plugged in
Alarm on
Bluetooth activated
Bluetooth connected
Symbols on the
external display
Battery LED
• Slow ashing: Battery is
charging
• On constantly: Battery is fully
charged
• Rapid ashing: Battery is out
of charge
Call LED
• Flashes when there is a
missed call
• Stops ashing as soon as
your has been Call info
viewed
Message LED
• Flashes when a new message
is received
• Stops ashing as soon as the
received message has been
read
ENGLISH–04
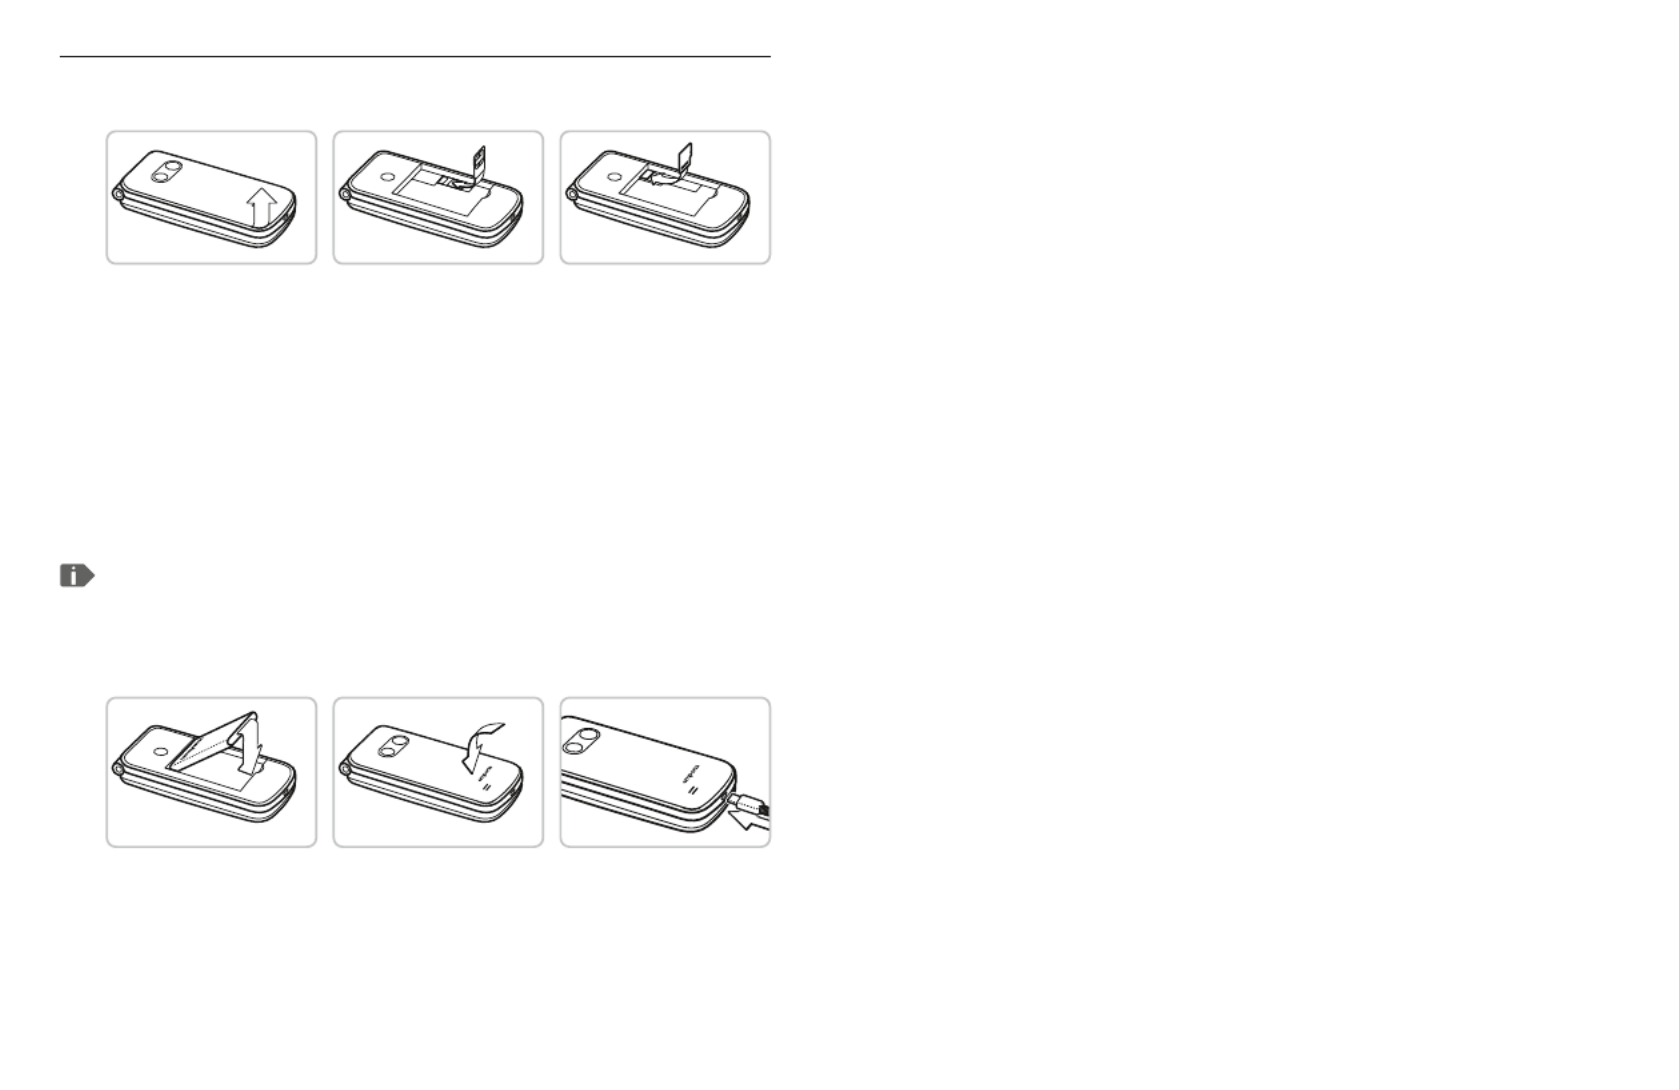
1. SETTING UP YOUR PHONE
1.1 Inserting a SIM card and a Micro SD card (optional)
1. Remove the battery cover (opening in the bottom left-hand
corner).
2. Slide the SIM card into the SIM card holder with the gold
contacts facing down. Note the marking next to the bracket.
3. Open the memory card holder (slide and lift up the ap). Insert
the Micro SD card into the memory card holder with the gold
contacts facing down and lock the ap back into place.
Taking photos and setting wallpaper are only possible when an
SDcard is inserted.
1.2 Inserting the battery
1. Insert the battery, making sure that the battery contacts touch
the phone's gold contacts.
2. Place the battery cover over the battery and click it into place.

ENGLISH–05
1.3 Charging the battery
Before you use the phone for the rst time, charge the battery for
at least 4 hours. If you don't charge the phone for this period of
time, the battery life could be reduced.
Never connect the phone to the charger or a PC if a battery has
not been inserted. Do not attempt to operate the phone without a
battery inserted. Doing this can damage the phone.
Charging with the charging cable
• Use a standard mains plug that you have at home.
• Connect the USB cable to the mains plug.
• Insert the USB-C connector into the phone's USB-C port.
• Then plug the cable's mains plug into a wall socket.
To avoid contact faults with the USB connector, only use the
charging cable supplied with the phone for charging.
Using a computer
Plug the phone into a USB port on your computer. If necessary,
disconnect the USB cable from the mains plug to do this.
Charging your phone via a computer will take longer than
charging it via the mains.

ENGLISH–06
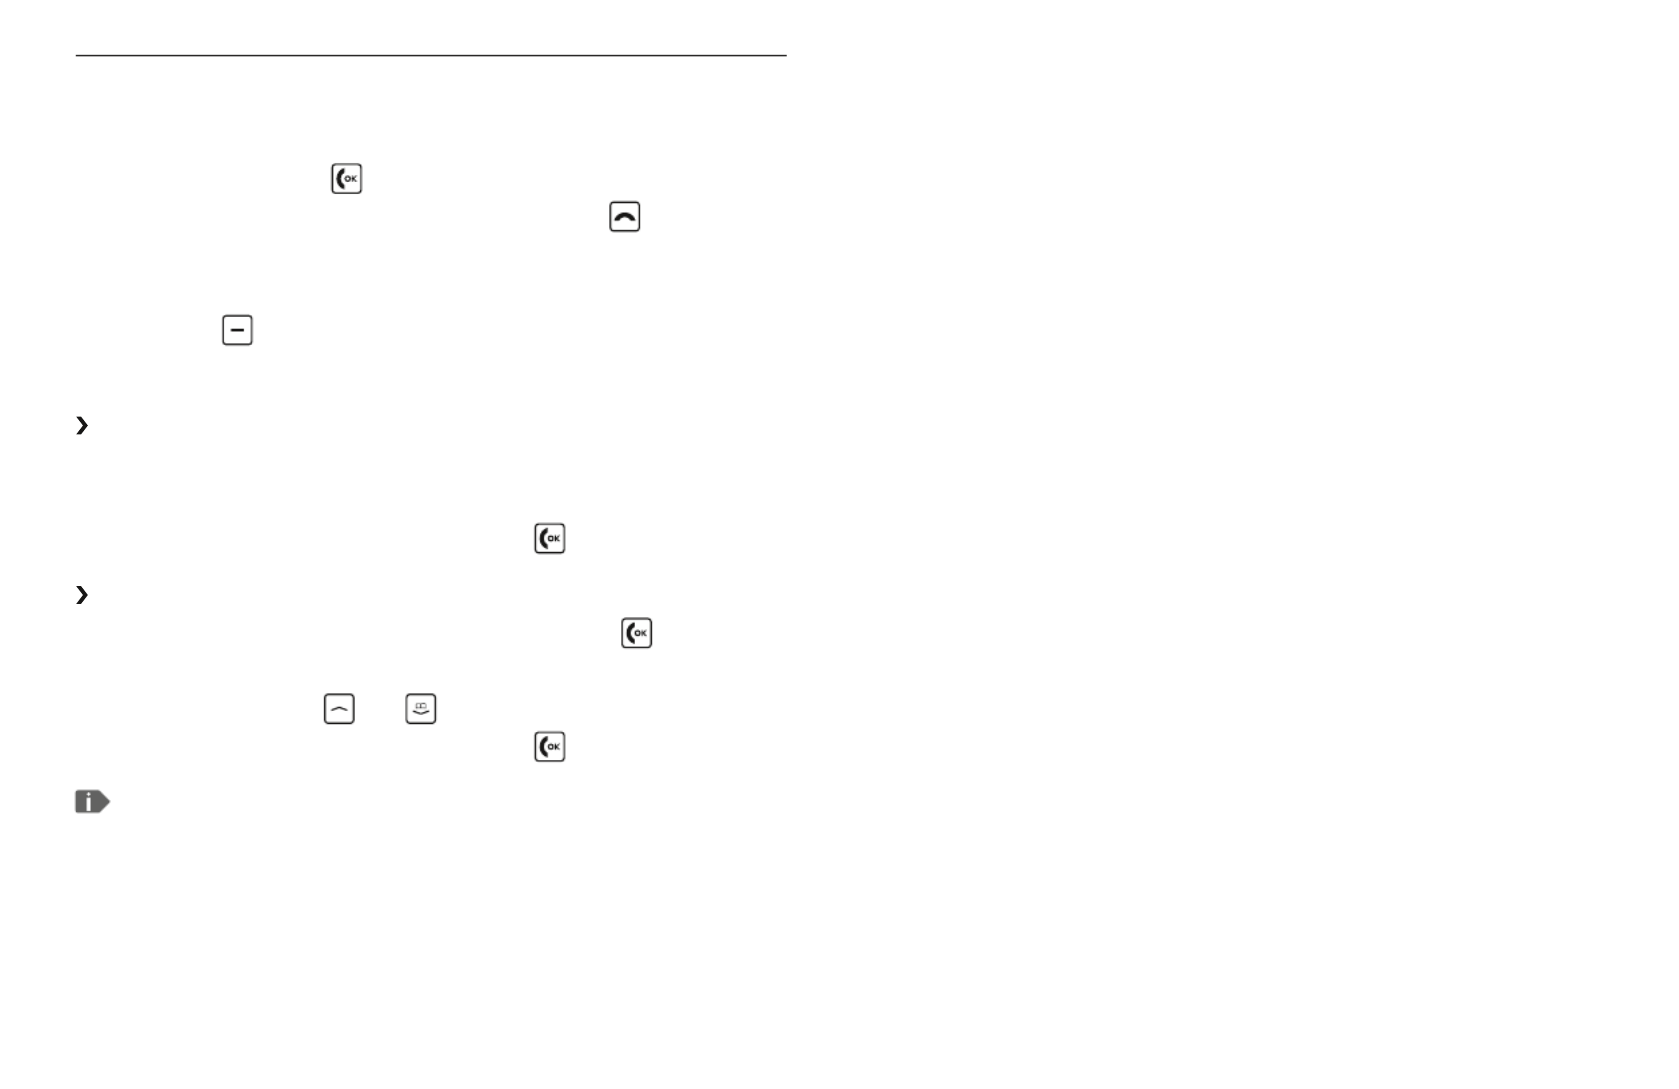
1.4 Turning on the phone
• Press and hold the key for at least 2 seconds until
theemporia logo appears. It will take a few seconds for
thehome screen to be displayed.
1.5 Entering a PIN code
Enter the four-digit PIN code for your SIM card when asked to
do so and conrm the entry.
You have a maximum of three attempts to enter the correct
number. If you enter the wrong number three times in a row,
you will only be able to unblock the SIM card with the PUK
code. Youwill nd your original PIN code and PUK code in the
documents supplied with your SIM card by your network operator.
1.6 Setting the language, time and date
1. Use to select a and then conrm your selection Language
by pressing OK.
2. Set the and then save these settings.Time and Date
1.7 Saving battery power
After a few seconds of inactivity, the screen will turn o to save
battery power. In the event of an incoming call or you pressing
any key, the screen will light up again.

ENGLISH–07
2. USING THE PHONE
2.1 Home screen
If your phone is on but not using a
function, it will display the home screen.
You can return to the home screen
anytime by pressing the redkey
several times.
2.2 Menu
The keywill display the menu. Themenu is a list that
enables you to manage the phone's various functions and
adapt the phone to your needs.
• Use the arrow keys to scroll through themenu.
• ,
The items available in the menu are Messages Photo
album, Tools, Contacts, Call info Settings and .
• Use the green key and red key beneath the screen to
conrm your selection or to return to the home screen.
Call Info
GSM
12:30
Sun, 21.04

ENGLISH–08
2.3 Dual-function keys
Pressing and holding the key: Allows you to listen to your
voicemail
Pressing and holding the key: Turns on Silent/Sleep mode
Pressing the key twice: + for a country code,
such as +49 for Germany
2.4 Writing text
You enter text using the keypad.
Press a number key multiple times
(e.g. 4 4 2 5 5 5 5 5 5 6 6 6 for Hallo).
• Special characters and symbols have been assigned to
thevarious keys, but can dier in some languages:
. , - ? ! 1 ' @ : ; ( ) * abc2äàåāâæçáć
def3đéē€èêë ghi4îïíìğι
j k l 5 £ m n o 6 ö ñ ô œ ó ò
pqrs7ß$ş t u v 8 ü ù û ú
wxyz9ŵýÿ Space 0
.,?!'"()@\/:_;+-*=%&<>₤$¥§€¤[]{}~#
• Use the key to switch between the input methods:
abc: All letters in lower case; ABC: All letters in upper case;
Abc: The rst letter is in upper case and all the letters
thatfollow are in lower case; Digits123:
ENGLISH–09
3. CALLS
3.1 Accepting, declining or ending a call
• To answer: Open the phone and
press the green key for .Accept
• To decline or end a call: Press the red button or
close the phone.
• To mute the ringtone temporarily,
press the volume control button.
3.2 Calling someone
Dialling a number
1. Enter the phone number you want to dial (incl. the area code)
using the keypad.
2. Start the call by pressing the green key .
Using the redial function
1. When on the home screen, press the green key .
Your will be displayed.Chats
2. Use the arrow keys and to select a number.
3. Start the call by pressing the green key .
To go hands-free during a call, open and turn on Options
thespeaker.

ENGLISH–10
4. MESSAGES (SMS)
Menu items: Write message Sent, Received, Unsent, ,
Delete messages, Text templates, Send contact via SMS,
SMS's in Contacts SMS settings,
4.1 Writing and sending a message
1. Open .Menu _Messages
2. Select Write message.
3. Enter the text using the keypad.
4. To specify a recipient for the SMS,
open Options and select .Send
5. You can now select a from the phone book or Contact
type in a Phone number using the keypad.
4.2 Reading a message
1. When you receive a new message, a symbol will appear
on the home screen.
2. Press the green key for and to read the message View
immediately.
3. You can nd the text message again later on in Menu
_ _ Messages .Received
4. To read a message, tap on it.

ENGLISH–11
5. PHOTO ALBUM AND CAMERA
5.1 Taking photos and recording videos
1. Open .Menu _Tools _Camera
2. in or out on the camera frame, use the volume To Zoom
buttons and on the side of the phone.
3. Thearrow key will open for the camera: Options
Self-timer, , , Effect Size Quality
4. Pressing the camera button or
the arrow key will Take a photo.
5. The photo you've taken will immediately be stored in
thephoto album.
6. Press the green key to go straight from the camera to
thephoto album.
Taking photos and setting wallpaper are only possible when an SD
card is inserted.
5.2 Viewing photos
All the photos you take will be sorted and displayed
chronologically.
1. Open Menu _Photo album.
2. Use the arrow keys to scroll through the photos on the
overview screen.
3. Pressing the green key will open for Options
the selected photo:
• : A complete, full-screen version of the selected photo View

ENGLISH–12
will be displayed. You can use the arrow keys to move to other
photos.
• : This option allows you to send the selected photo to a Send
recipient as an MMS message. (Please not that this will incur
additional costs.)
• : You can use the selected photo as your wallpaper Wallpaper
on the home screen.
• : You can give the selected photo or Rename
video a new le name.
• : This option will delete the selected photo or video.Delete
• Delete all: This option will delete the entire photo album.
5.3 Backing up photos on your PC
1. Plug the USB connector end of the USB cable supplied with
thephone into your PC and the other end into your phone.
2. The PC will now detect your phone and display the phone's
internal memory.
3. You can then select les from the album and copy PHOTOS
them to your PC.

ENGLISH–13
6. TOOLS
Menu items: , Alarm clock Calendar, Calculator, , Camera
Bluetooth and SIM Services
6.1 Alarm clock
1. Open .Set time
2. Enter your desired and then Alarm time Save it.
3. The alarm clock is activated and will now go o at the time you
have set every day.
4. When the alarm is ringing, you can press the red key to turn
it o or the green key to activate the snooze function.
5. Select Off to deactivate the alarm permanently.
If the phone is turned o, the alarm is turned o as well.
The alarm will therefore not sound when the phone is o.
6.2 Calendar
Use the arrow keys to move up and down,
and and to move to the left and to the right.
It is not possible to save appointments in this calendar.

ENGLISH–14
6.3 Calculator
• Enter the numerical values using the number keys.
• To write the decimal point in decimal numbers, use .
• Press to select the calculating function.
• Pressing will display the result.
6.4 Bluetooth
1. Turn the Bluetooth function . On
2. Tap on and on Connect Search for new devices.
A list of available devices will be displayed.
3. Select the device you want to pair the phone with from the list.
4. Follow the instructions to pair the devices.
Devices that have been connected before will be recognised and
connected automatically.

ENGLISH–15
Menu items: Search for name, Add contact Edit contact, ,
Delete, Send contact via SMS, Copy contacts, My number,
Speed-dial keys, Emergency contacts, Contact settings,
SMS's in Contacts
7.1 Searching for a contact in the phone book
1. When on the home screen, press the phone book key or
open Menu _Contacts _Search for name.
2. Use the arrow keys and to scroll through the entries or
use the keypad to type the rst letter of the contact you are
looking for.
3. Start the call by pressing the green key .
7.2 Adding a contact
1. Open Menu _Contacts _Add contact.
2. Enter the phone number and the person's name and
then them.Save
Always save names and numbers with the international dialling
code, e.g. +41 for Switzerland, +43 for Austria and +49 for Germany.
7.3 Editing contact
Edit the previously saved entries and save your changes.
7.4 Deleting a contact
• Select a contact you want to delete. Single:
• Delete all: Specify whether you want to delete all the contacts
from the SIM card or from the phone.
7. CONTACTS

ENGLISH–17
7.9 Contact settings
• or Save entries on SIM Phone
• : Memory in use SIM, or Phone both
• Automatically save in Contacts: On or Off
• : Up to 250 contacts can be saved on the Memory status
SIMcard and up to 300 contacts can be saved on the phone.
7.10 SMS's in Contacts
If you receive a message that contains text in the format
#Name#Number#, the text will be saved in your contacts
automatically. Specify whether this function should be
switched on or o and whether only entries from saved
numbers are permitted in contacts.
ENGLISH–18
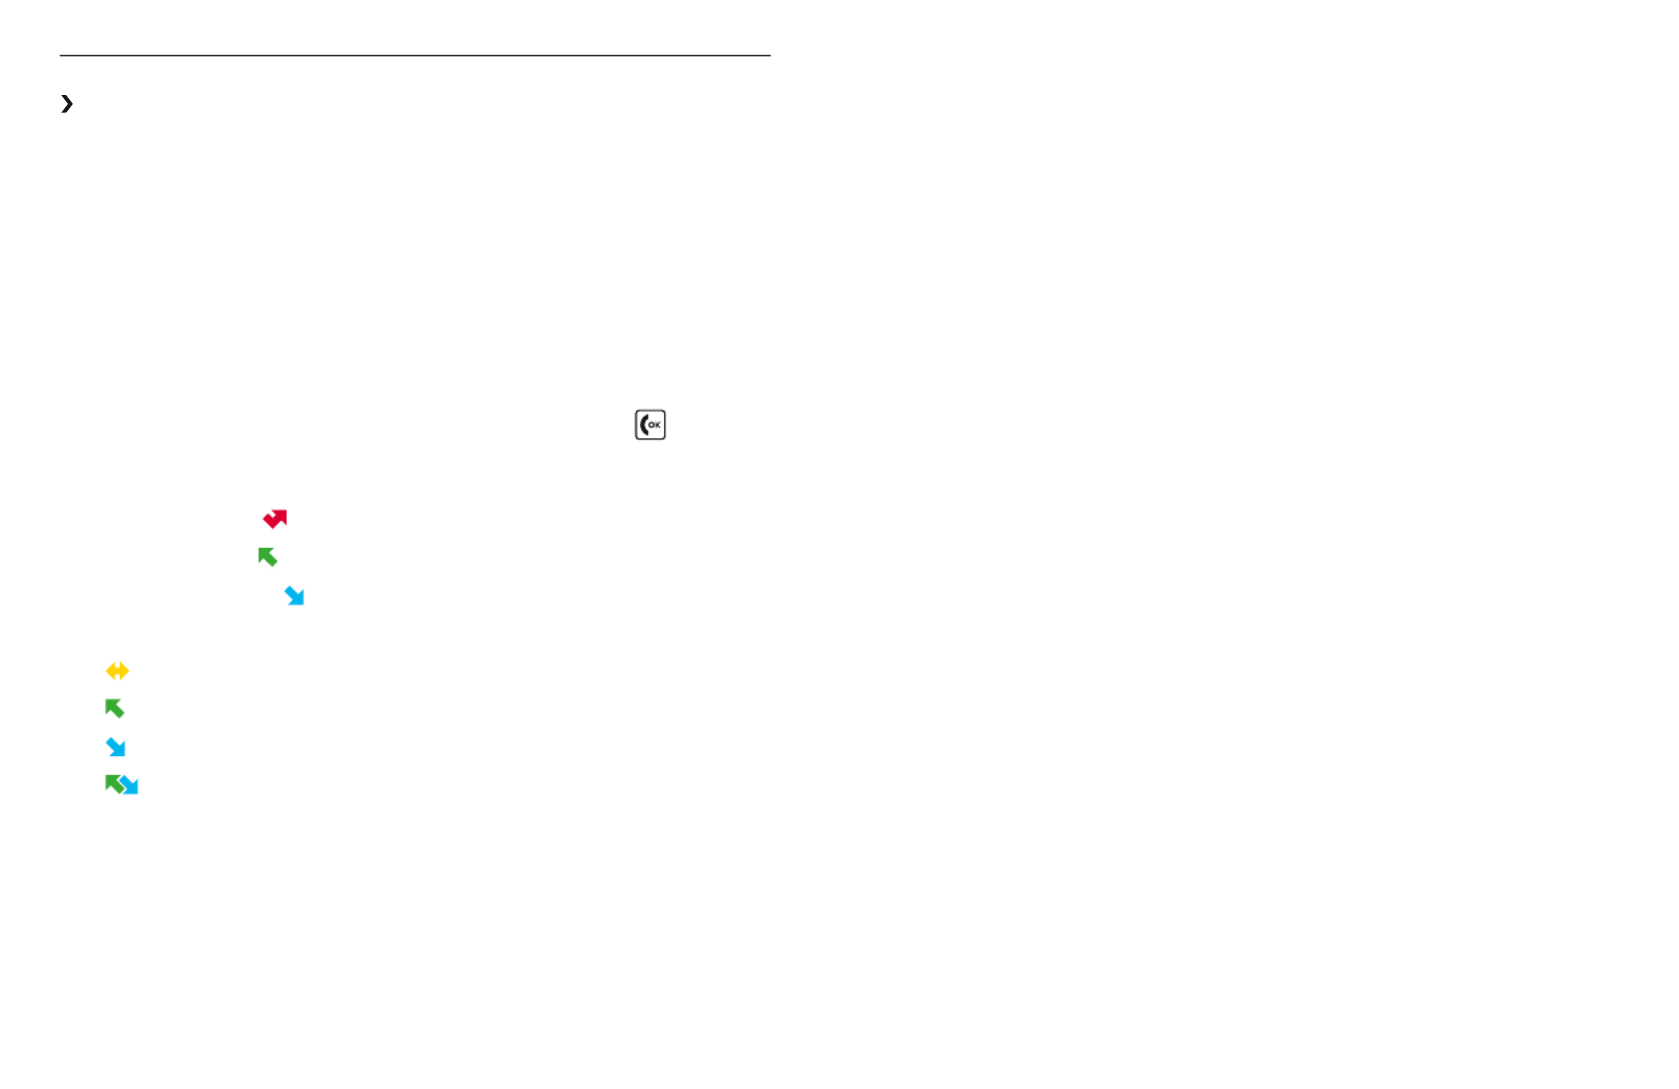
8. CALL INFO
Menu items: , , Missed calls Dialled calls Received calls,
Call duration and Delete
Each list is sorted chronologically and shows the date and
timeof each call beneath the contact's name or number.
Options: , , , Call Save in Contacts Edit number before call
Write message, and Delete
When on the home screen, you can access your Chats
containing all your calls by pressing the green key .
The symbols indicate the following:
• Missed calls
• Dialled calls
• Received calls
• Call duration
Duration of the last call
Total duration of all outgoing calls
Total duration of all received calls
Total duration of all calls
Tuotetiedot
| Merkki: | Emporia |
| Kategoria: | Älypuhelin |
| Malli: | TALKglam |
Tarvitsetko apua?
Jos tarvitset apua merkille Emporia TALKglam esitä kysymys alla ja muut käyttäjät vastaavat sinulle
Älypuhelin Emporia Käyttöohjeet

20 Helmikuuta 2025
28 Joulukuuta 2024
20 Joulukuuta 2024
20 Joulukuuta 2024
Älypuhelin Käyttöohjeet
- Älypuhelin TCL
- Älypuhelin Samsung
- Älypuhelin Tecdesk
- Älypuhelin Opis
- Älypuhelin Kogan
- Älypuhelin Xiaomi
- Älypuhelin Honor
- Älypuhelin MyPhone
- Älypuhelin Medion
- Älypuhelin Kyocera
- Älypuhelin Motorola
- Älypuhelin Aplic
- Älypuhelin CSL
- Älypuhelin Hammer
- Älypuhelin Acer
- Älypuhelin Alcatel
- Älypuhelin Aligator
- Älypuhelin HMD
- Älypuhelin InFocus
- Älypuhelin EVOLVEO
- Älypuhelin I.safe Mobile
- Älypuhelin Oppo
- Älypuhelin Huawei
- Älypuhelin Bea-fon
- Älypuhelin Allview
- Älypuhelin Blu
- Älypuhelin Custom
- Älypuhelin Apple
- Älypuhelin Sonim
- Älypuhelin CAT
- Älypuhelin HTC
- Älypuhelin Volla
- Älypuhelin Umidigi
- Älypuhelin Yarvik
- Älypuhelin ZTE
- Älypuhelin Vivo
- Älypuhelin Nokia
- Älypuhelin Doro
- Älypuhelin Logicom
- Älypuhelin Echo
- Älypuhelin POCO
- Älypuhelin Jitterbug
- Älypuhelin Bluebird
- Älypuhelin Nothing
- Älypuhelin Nothing Tech
- Älypuhelin Maxwest
- Älypuhelin Krüger&Matz
- Älypuhelin NGM-Mobile
- Älypuhelin Nubia
- Älypuhelin Kalley
Viimeisimmät Älypuhelin Käyttöohjeet
2 Huhtikuuta 2025

30 Maaliskuuta 2025
10 Maaliskuuta 2025
26 Helmikuuta 2025
26 Helmikuuta 2025
26 Helmikuuta 2025
26 Helmikuuta 2025
26 Helmikuuta 2025
26 Helmikuuta 2025
26 Helmikuuta 2025