Evga Z10 Käyttöohje
Evga
Näppäimistö
Z10
Lue alta 📖 käyttöohje suomeksi merkille Evga Z10 (7 sivua) kategoriassa Näppäimistö. Tämä opas oli hyödyllinen 4 henkilölle ja sai 4.5 tähden keskimäärin 2 käyttäjältä
Sivu 1/7
E006-00-000062

Table of contents Overview
Overview ....................................................................................................... 2
Hardware Installation ................................................................................... 3
Quick Start .................................................................................................... 3
Hardware Installation Details ....................................................................... 4
Graphics Cards Requiring Additional Power .............................................. 4
SLI Installation .............................................................................................. 5
Software Installation .................................................................................... 5
Setting up Multiple Displays ........................................................................ 6
Quick Fixes ................................................................................................... 7
Additional Support ....................................................................................... 8
Compliance Information .............................................................................. 9
Thank you for purchasing a genuine EVGA graphics card. EVGA is an NVIDIA
® Authorized Solution Provider that
builds high performance 3D cards. Our graphics cards are fully compatible with the latest 2D and 3D graphical
requirements.
Before installing your EVGA graphics card, it is to first register the product to receive the full highly recommended
support and warranty. You can register your card online at www.evga.com/register.
EVGA also strives to provide a full range of programs and services to enhance the customer experience including
but not limited to:
EVGA Advanced RMA (EAR) Program:
The EVGA Advanced RMA (EAR) Program is a program to protect yourself and your product in the case of product
failure. For more information please visit www.evga.com/support/ear.
EVGA Step-Up® Program:
In order to give our customers the greatest amount of flexibility when purchasing EVGA graphics cards, we have
instituted the EVGA Step-Up® Program. For more information please visit www.evga.com/stepup.
EVGA Online Community:
To visit the EVGA community forums, please visit www.evga.com/forums for more information.
EVGA Precision XTM:
Designed from the ground up to support new GPU technology, EVGA Precision X
TM redefines what overclocking
software should be. For more information please visit www.evga.com/precision.
EVGA OC Scanner X:
Featuring a brand new look and layout, this popular application has been adapted to show all of the latest GeForce
vitals. For more information please visit www.evga.com/ocscanner.
EVGA FAQ:
To search our knowledge base and product FAQ, please visit www.evga.com/faq for more information.
EVGA GamingTM:
If you live to game, this is the place for you! We have the best tournaments, prizes and game servers. For more
information please visit www.evga.com/gaming.
Folding@EVGA:
Distributed computing for the greater good. Did you know that you can turn your graphics card into a shared
supercomputer? For more information please visit www.evga.com/folding.
EVGA Social NetworksTM:
Stay up to date on contests, promotions, tech tips, new products, driver releases and more by following EVGA on
your favorite social network! For more information please visit www.evga.com/sonet.
MODS RIGSTM:
$1K Sponsorships for every 200 posts. Come show off your rig and join in on one of the biggest things happening
at EVGA. For more information please visit www.modsrigs.com.
EVGAontheTUBE:
New product unboxing, overview and features! For more information please visit www.youtube.com/teamevga.
Hardware Installation Details
Graphics Cards Requiring Additional Power
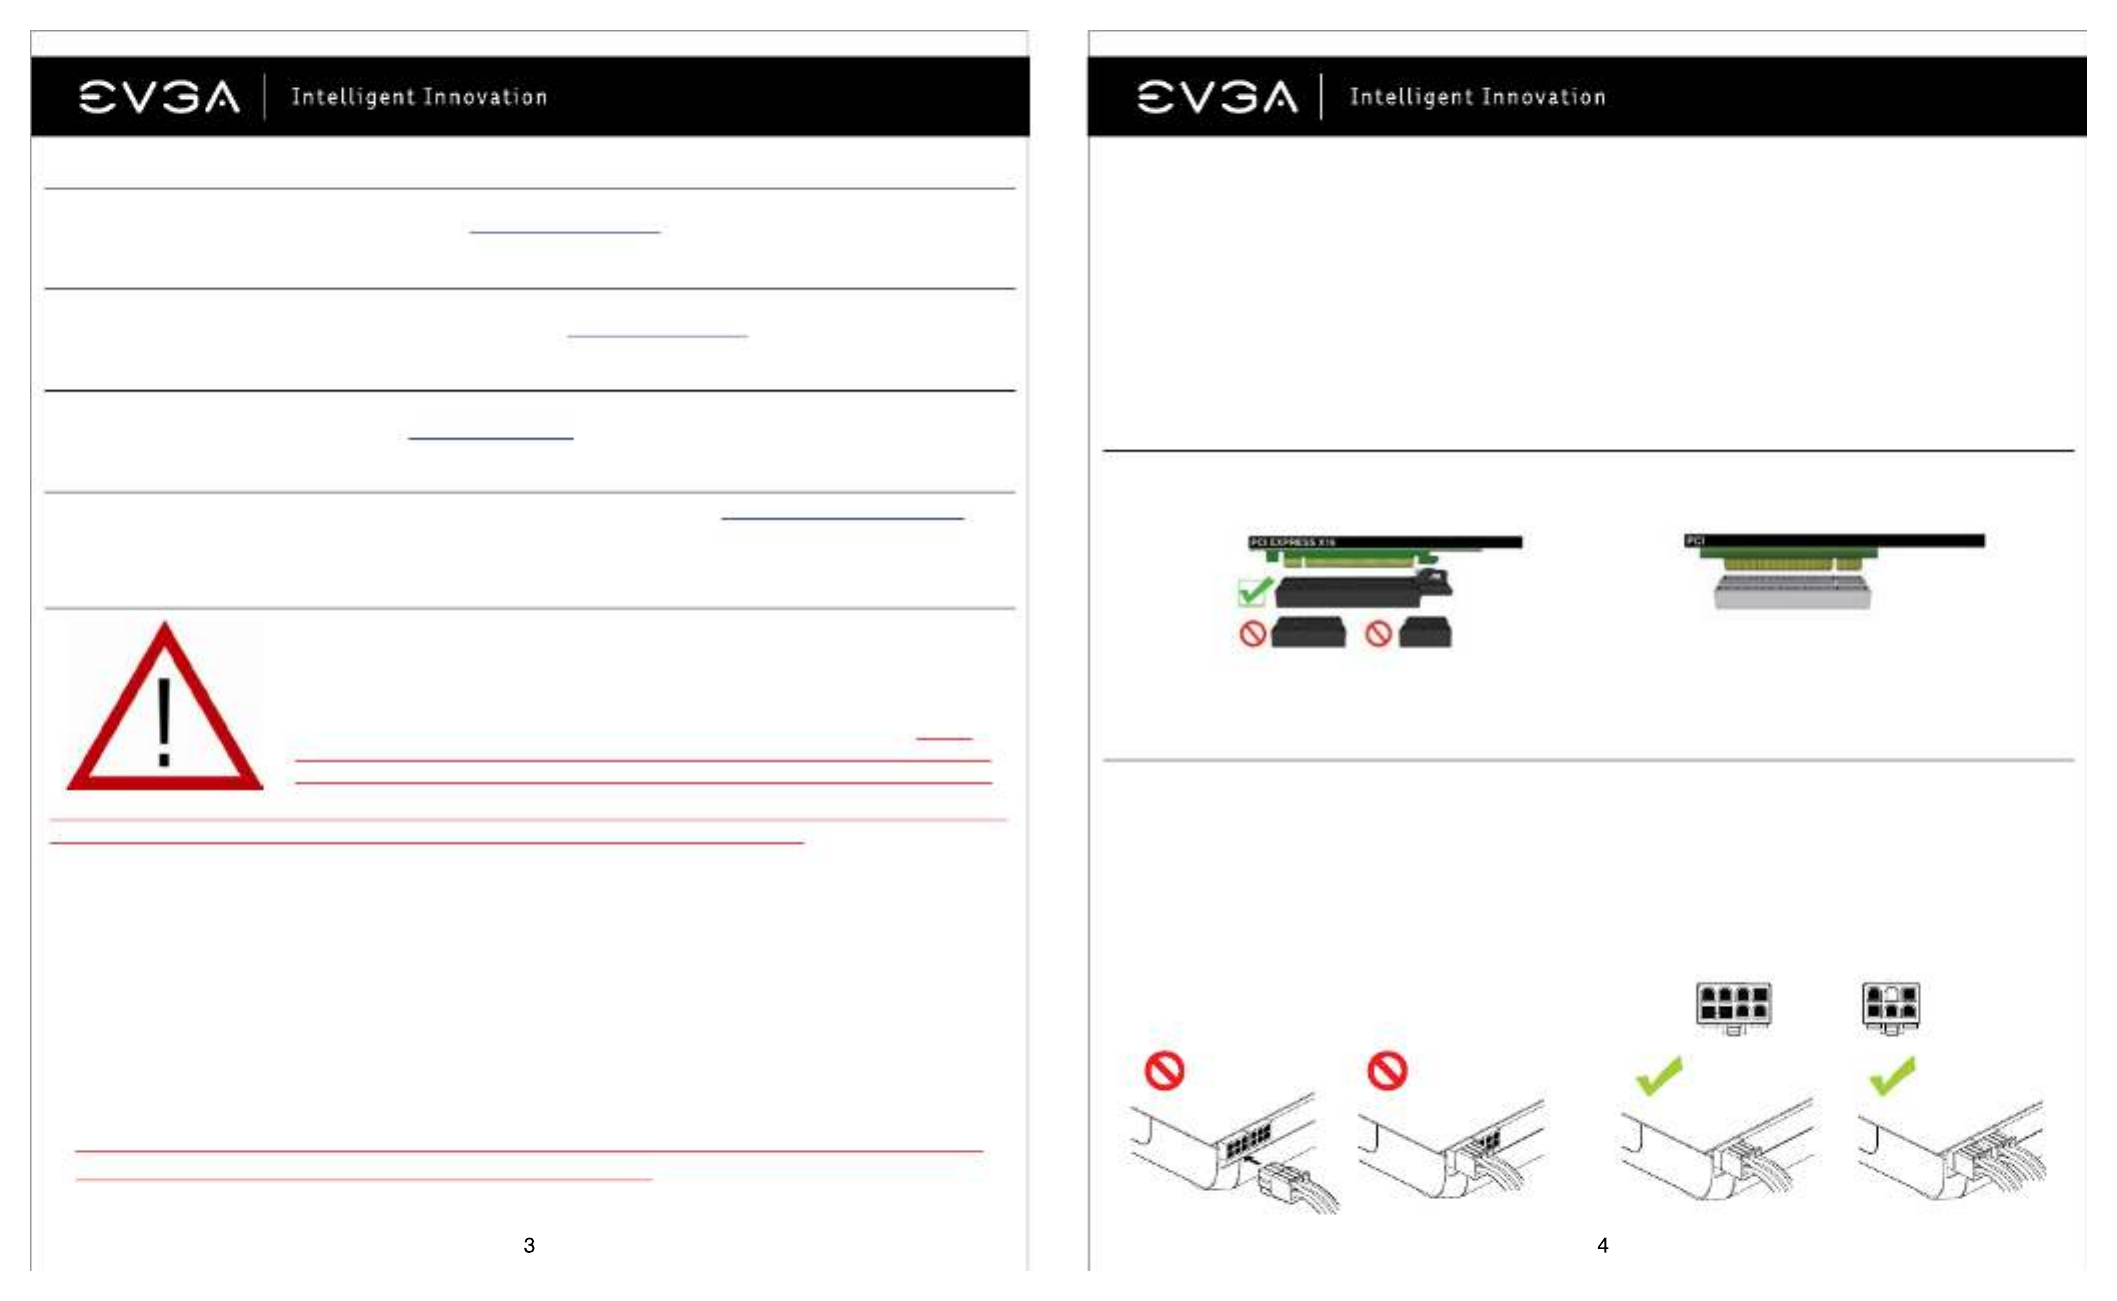
PCI Express (PCI-E) and PCI slots are different, so prior to installation; please verify that the graphics card bus type
and available slot are the same.
If your graphics card is equipped with a supplemental power adapter, it is required that it be connected at the time
of installation. This supplemental power adapter ensures that your graphics card receives the necessary power that
will allow it to function at optimal performance levels. Your card may require one or more 6 or 8-pin PCI Express
(PCI-E) supplemental power connectors. Please note that the 8-pin PCI-E power connector is not the same as the
8-pin CPU power connector. Please see the below illustration.
Always use the PCIE power cables from your Power Supply first, only use included adapters when your Power
Supply does NOT have the appropriate connectors.
Hardware Installation
the installation procedure, consult a qualified computer technician. Damage to the system components, the
graphics card, and injury to yourself may result if power is applied during installation. Now that you have
prepared your computer, you are ready to install your graphics card.
Quick Start
1. Before starting installation, it is recommended to completely remove all drivers for your existing graphics card
(If you have one).
2. Power off the computer and all attached devices (keyboard, mouse, etc.).
3. Disconnect the display cable from your current display adapter on the back of the computer.
4. Remove your existing graphics card (if you have one) from your computer. You will do this by removing the
retaining screw, and pulling the card directly up and out of the system. Please note that your motherboard may
have a PCI Express (PCI-E) latch on the slot that needs to be pressed in first.
(NOTE: If your motherboard has integrated or onboard video, you may need to disable it first, please contact
your system or motherboard manufacturer for additional information.)
Preparing Your Computer
WARNING: Turn off the power to your system and discharge your body’s static
electric charge by touching a grounded surface – for example, the metal surface of
the power supply or chassis – before performing any hardware procedure. EVGA
assumes no liability for any damage, caused directly or indirectly, by improper
installation of any components. If you do not feel comfortable with performing
5. Align your new card with the appropriate slot, (see illustration below) and press it in firmly until the card is fully
seated. Make sure that the metal contacts of the card are completely pushed into the expansion slot.
6. Connect the supplemental PCI Express (PCI-E) power adapter(s) to the card if applicable. (See illustration
below.)
7. Replace the retaining screw to fasten the card into place, and then replace the computer cover.
8. Reconnect any devices that you detached during installation, and then connect the monitor’s video cable to
your new graphics card.
9. Apply power to your system, boot to the operating system and install the proper drivers.
PCI Graphics Cards PCI Express (PCI-E) Graphics Cards
8 pin or 6+2 pin 6 pin
Tuotetiedot
| Merkki: | Evga |
| Kategoria: | Näppäimistö |
| Malli: | Z10 |
Tarvitsetko apua?
Jos tarvitset apua merkille Evga Z10 esitä kysymys alla ja muut käyttäjät vastaavat sinulle
Näppäimistö Evga Käyttöohjeet

29 Maaliskuuta 2025
Näppäimistö Käyttöohjeet
- Näppäimistö Vorago
- Näppäimistö AOC
- Näppäimistö Philips
- Näppäimistö Krom
- Näppäimistö Razer
- Näppäimistö Kogan
- Näppäimistö Behringer
- Näppäimistö GoGEN
- Näppäimistö Yamaha
- Näppäimistö Urban Factory
- Näppäimistö Trust
- Näppäimistö Goldtouch
- Näppäimistö Asus
- Näppäimistö BlueBuilt
- Näppäimistö Gembird
- Näppäimistö Roccat
- Näppäimistö Woxter
- Näppäimistö Lenovo
- Näppäimistö Sharkoon
- Näppäimistö RGV
- Näppäimistö Dell
- Näppäimistö CSL
- Näppäimistö Elgato
- Näppäimistö Corsair
- Näppäimistö Conceptronic
- Näppäimistö DeepCool
- Näppäimistö Genesis
- Näppäimistö MSI
- Näppäimistö V7
- Näppäimistö Goodis
- Näppäimistö Speed-Link
- Näppäimistö R-Go Tools
- Näppäimistö Native Instruments
- Näppäimistö Crestron
- Näppäimistö Manhattan
- Näppäimistö EVOLVEO
- Näppäimistö ModeCom
- Näppäimistö Boss
- Näppäimistö Xtrfy
- Näppäimistö Bluestork
- Näppäimistö Ducky
- Näppäimistö IOPLEE
- Näppäimistö Xtech
- Näppäimistö Mad Dog
- Näppäimistö STANDIVARIUS
- Näppäimistö Techly
- Näppäimistö Voxicon
- Näppäimistö UNYKAch
- Näppäimistö ADATA
- Näppäimistö Carlsbro
- Näppäimistö Accuratus
- Näppäimistö Gamesir
- Näppäimistö NGS
- Näppäimistö Havis
- Näppäimistö Kurzweil
- Näppäimistö HyperX
- Näppäimistö Keychron
- Näppäimistö Rapoo
- Näppäimistö Savio
- Näppäimistö Erica Synths
- Näppäimistö Logitech
- Näppäimistö Cooler Master
- Näppäimistö NUX
- Näppäimistö Medeli
- Näppäimistö SureFire
- Näppäimistö Dexibell
- Näppäimistö Steelseries
- Näppäimistö Xcellon
- Näppäimistö 4ms
- Näppäimistö SMK-Link
- Näppäimistö IQUNIX
- Näppäimistö Loupedeck
- Näppäimistö Ketron
- Näppäimistö Cherry
- Näppäimistö Alogic
- Näppäimistö Hamlet
- Näppäimistö Perixx
- Näppäimistö MK
- Näppäimistö Tiptop Audio
- Näppäimistö On-Stage
- Näppäimistö Kawai
- Näppäimistö Xuma
- Näppäimistö Royal Kludge
- Näppäimistö Moog
- Näppäimistö Nanoxia
- Näppäimistö BakkerElkhuizen
- Näppäimistö X9 Performance
Viimeisimmät Näppäimistö Käyttöohjeet
30 Maaliskuuta 2025
30 Maaliskuuta 2025
30 Maaliskuuta 2025
30 Maaliskuuta 2025
30 Maaliskuuta 2025
30 Maaliskuuta 2025
29 Maaliskuuta 2025
29 Maaliskuuta 2025
29 Maaliskuuta 2025
29 Maaliskuuta 2025